 |
||
|
|
| |
||
|
|
February 3, 2014
Even though it seems the hub issue is better everyone I talk to about this says I am really risking a serious failure. That being said I have decided to get the tried and true Moser axels to replace the AMC two piece units. Getting the old axels out will be the first hurdle. I have unbolted the backing plate, removed all the brake stuff, although that isn't necessary, and am ready to pull them after I get a slide hammer. Since I am under there I might as well address some other things. The rear springs are weak with the passenger side arc being quite a bit less than the driver side. I have ordered new leaf spring and bushings. I am also going to get pads for my rear sway bar welded to the axle tubes instead of the lame friction fit that is on there now. For rear brakes I want to get rear discs but so far all I have found are Wilwoods which are awesome but crazy expensive. I may try adapting a different car's conversion to mine if it is cost effective. I have made a check list and it has gotten rather lengthy! So for now the AMX is up on stands fot the near future.
February 4, 2014
Today I changed out the rear rubber brake line that was showing some wear. I removed the bottom shock mounts, drained the diff, took off the rear sway bar and started making a fixture to help me get the diff out from under the car. A friend of mine has a real axle puller which is going to make it easier to pull the axles....I hope.
February 5, 2014
One of the guys on the AMC Forum told me to loosely mount a brake drum backwards on the wheel studs and use that as a slide hammer. Amazingly it worked great, took 5 - 10 pulls to get it to release but they are out. Unfortunately the pin that holds the rubbing block inside the diff did not shear off. That block has to come out for the Moser axles so I will need to pull the carrier to drive out the pin. The hardest part of all this was getting the e-brake cable out of the backing plate. I pulled the backing plate off the axles to make measuring the length easier. I called Moser and gave them the axel lengths, driver side is 27 9/16" passenger is 28 7/8". I also asked him about the rubbing block just to be sure it should come out.
February 6, 2014
I ordered the Moser axles today. I optioned for longer screw in studs in case I want to install wheel spacers again. They should be here in a few days but I still have a lot of work to do before I can install those. I also ordered the outer axles seals off EBay.
February 8, 2014
I didn't have much time to work on the car today but I started to remove the leaf springs. I pulled off the u-bolts on the axle tubes which also released the shock mount and the torque links. Next I took the nuts off the rear shackles, that's when it got difficult. The opposite side of the shackles does not have a bolt you can pull. Instead the bolt is either captured or is actually part of the shackles themselves. I could not get the shackles or the bolt to come out of the bushings. At this point I ran out of time. I will attack this again tomorrow. I may try using a pry bar to pull the shackle off. Failing that I may have to resort to cutting them off. I have new shackles I will be installing so cutting them off is not a really bad thing.
February 9, 2014
The pry bar worked like a champ on the rear shackles. The front mounts were a bit tougher. But with the use of a breaker bar and some pipe for extra leverage I got the nut off. Pulling the bolt through the bushing was a little difficult but once I supported the rear of the spring to take tension off the front bushing they finally came out. I still have not decided on what to do for rear disc brakes. I got all the old paint and crud off the axle housing. I will paint a semi-gloss black before reassembly. I have bought a ribbed polished aluminum cover for it. I was searching around for torque link bushings and found one of the guys on the AMC Forum that will rebuild them including media blasting, priming and new rubber bushings which are preferred for these rather than using poly bushings. The cost is reasonable so I will send them off. When I get them back I will paint them black or maybe red. I am also thinking about painting the rear sway bar red.
February 10, 2014
Not too much accomplished today. I painted the spring plate/shock mounts and the spring u-bolts. I also picked a brake line adapter that will allow me to use an adjustable Wilwood proportioning valve. The line coming from the front of the car to the stock valve is 1/4" while the output of the valve is 3/16". The Wilwood uses 3/16" on both sides.
February 11
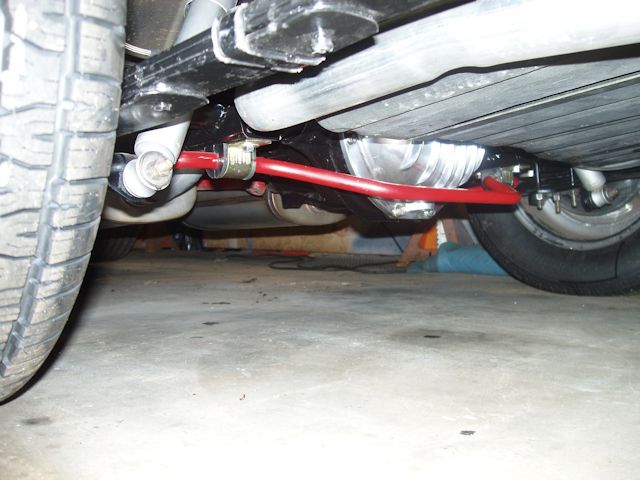
I preparation of upgrading to rear disc brakes I installed a Wilwood adjustable rear proportioning valve. It will replace the stock valve. I painted my rear sway bar red using caliper paint.
February 12, 2014
This crazy winter has reared its ugly head again and I just didn't feel like dealing with the cold garage today. So instead I sent time searching for disc brake parts. I don't feel like shelling out close to a grand for Wilwood brakes and making something else work should not be rocket science, I did it on the Z. I picked up a mounting bracket for a Jeep conversion knowing I will no doubt have to modify it for whatever calipers I end up using. This bracket was designed to use some pretty obscure pieces, like Suzuki Samurai rotors, which have the wrong bolt pattern, and 300ZX calipers, which would be fine but they are expensive! I want something a bit more available and less costly. So I have decided on 1994 Mustang V8 parts. I got some loaded calipers and 10.8" rotors. Hopefully I can get all this to work and fit inside my wheels. All told so far I have $225 invested. I think I will be able to make any modifications I may need to the bracket myself. I have hoses to get, if I need them, and some mounting hardware but that's about it.
February 17, 2014
Way too much personal stuff has happened lately taking me away from the project. But I got back to it today. I've started cleaning up and painting the rear frame rails, wheel wells and the fuel tank. Like most projects this one has taken on a mind of its own! The Moser axels came today so I need to pick up the pace on this. I will have to take the axles somwhere to get the bearings and backing plate pressed on. In the mean time I still need to pull the carrier to get the no longer needed end play hats out since the Mosers use sealed bearings instaed of tappered ones. The new leaf springs are not here yet.
February 19, 2014
Sometimes luck is on my side. I thought the hat pin was not broken and I was about to pull the carrier but decided to give it one more attempt to get the hats out. I stood the axle on end and the crazy hat fell out. Flipped the axle and the other one fell out. Man what a relief, I did not want to pull that carrier. A little more clean up and I will paint the assembly.
February 24, 2014
I had the axle bearings pressed on today. So the axels are ready to be installed. However I will wait until the springs get here and install the axles after the rear end is back in the car. Because I am swapping out the drum brakes for discs I cut the old drum backing plates to match the outter axle seals. That way all the metal fits correctly and adds some thickness to attach the bolts. After the rotors get here I will know better about which side of the axle flange the caliper brackets will sit. But I think bolting the caliper brackets to the outside around the old backing plates and the seals might make the calipers line up better with the rotors.
February 25, 2014
A few things came in today. The leaf springs finally arrived, they look great and came with new rear bushings, I did not expect that. The rear disc rotors also arrived, but there is a small issue. Since they are for a Mustang the center bore is made to be hub concentric and of course the Moser axles are not. Looks like I'll have to take off a tiny bit of metal. I have a lot of parts now so I can get busy putting this all back on the car.
March 1, 2014
I finally got off my butt and started to put the car back together. I still don’t have everything I need but some stuff can go back in. The springs are the first thing, well at least the front mounts can be installed. I put the new poly bushings in the springs, not too tough but they took some persuading even with the silicone grease that came with them. Getting the bolt back in took some creative maneuvering, especially on the driver side where the e-brake cable is in the way, but I got both sides in. The rear shackle bushings were another story altogether! I tried cleaning the bushing mount holes the best I could, but you can’t really see up in there. I greased up the bushings but they were really tight and would not just slide in. Being two pieces with the metal sleeve made it even harder. I ended up getting a long bolt the same size as the shackle bolt and used that to pull the two pieces together. Next I will get the rear axle assembly into place so I can mark where I want to weld on the sway bar brackets.
March 3, 2014
I test fitted the axle assembly to the new springs. I had a problem getting the springs to line up on the axle mount, I should have recruited some help. But after loosening the shackles a little I got them in. I then put the rear sway bar in place and measured for its placement but discovered a problem with the spring mounts I got for weld in brackets. They hang down a little too much so I modified them. I removed about Ľ” of metal to get the brackets to fit closer to the axle tubes. I pulled the whole thing apart again, ground off the paint where the brackets will be welded and reinstalled them making sure they are plumb and square with the spring mounts. I will take the whole axle assembly to my buddy to have them welded on. I got a message from 401MATCOUPE on the AMC message board that he has my torque link refurbished and will send them soon. What at first seemed like a quick job is taking longer than expected. But that’s okay, I’m in no big hurry.
March 7, 2014
I got the rear sway bar brackets welded on today. I also ordered stainless brake hoses and brackets for the disc conversion. There are a lot of “extra” things to get for a rear disc conversion. At this point I’m thinking I might have just been better off buying a ready built kit for this… but where is the fun in that!
March 8. 2014
I hit the sway bar bracket welds slightly with the grinder to get any leftover slag off and laid down some POR-15 over all the exposed metal. I will let that setup for a couple days before installing the axle assembly back in for keeps this time….I hope! My torque links arrived today from being rebuilt, looks like I have some more clean up and painting to do. Then I can install the Moser axles. If that all goes well I can then attempt to get the disc brake conversion sorted out.
March 10, 2014
I cleaned up the torque links, man what a mess. Grease, grim and undercoating was tough to get off these. The bolts, washers and spacers got hit with the wire wheel to clean them. I painted the links and brackets with my tried and true wheel paint, choosing a graphite color this time hitting them first with some adhesion promoter.
March 15, 2014
If you’re a real hot rod person you can only put off working on your car so long. So today I declined several invitations and went out to the garage to start putting this old “Nash” back together. The main objective today was to get the rear axle assembly, springs, shocks, driveshaft and torque links installed. I did manage to get all that done without too much difficulty. Of course I can’t adjust the torque links until everything is done and I can load the springs. The shop manual says to load in the trunk to get the top of the axle tube to be 6 11/16” below the frame and then torque the bolts to 100 ft/lbs! The Forum says that takes about 400 pounds, I have no clue how I will do that! But first I need to install the new diff cover and the rear sway bar. Then the scary part, the Moser axle install. Its only scary because this is new territory for me. From what I understand it is just simply lining up the splines and smacking the end of the axle to drive the bearing into its seat. Hopefully it is that easy. Then of course there is that rear disc brake design and install. After I get the axles in I will have a better idea of what modifications I need to do to the caliper brackets. It doesn't seem like this will be to hard.......I probably should not have said that!
March 16, 2014
I didn’t have too much time to devote to the car today but I got a few things done. I installed the rear sway bar, those welded on brackets are nice. I also got the finned diff cover in place but I’d forgotten I need to get a new gasket so final bolt down will have to wait. Then I slide the axles into position, I will admit I was more than a little apprehensive about this step but it went well. All that is left is to grease the seals and seat the bearings into place. I pulled off the rear brake axle tee fitting and the brake lines since the Mustang hoses are not the same thread size. I decided to get the correct tee fitting for the Mustang Ľ” hard lines. I will have to adapt the inlet of the tee to match the stock brake hose coming from the proportioning valve. The e-brake cable is another unknown, I’m sure the stock one is not going to work. Hopefully it can be modified.
March 20, 2014
A few days away but I am back on the car. Today I bite the bullet and seated the axles, actually that was pretty easy and all went well…...WHEW! The gasket for the diff cover was in stock at Oreilly’s so I installed that too. But when I attempted to install the brakes things took a downward turn. I know very little about Ford parts, still not sure why I decided to use Ford. Research is a good word. I have learned over the years of playing with cars to always do research before committing to any project. However I’m not the best researcher! This project is a fine example of doing bad research. I did not know enough about Mustangs and ended up with a set of 1993 calipers only to find the rotors I bought for a 1993 Mustang are 4 bolt units, not the five bolt rotors I thought. I got a set of 5 lug rotors but the thickness of these was only ˝” and the calipers needed 1” rotors….…grrrrrrrrr. I got another set of calipers, this time for a 1994 which match the rotors. All in all not a huge thing but it was time consuming delaying this project several weeks.
March 21, 2014
Another short day, but I managed to get the diff filled with Lucus 75W-90 synthetic lube and stuck in some Ford friction modifier just to be safe. I used a little pump I picked up that screws right on the quart bottle. That made the procedure go much better with no mess at all. I also made a bracket to mount the brake line tee fitting and attached the hose from the chassis hard line.
March 23, 2014
While I wait for new 1994 Mustang calipers to come in I modified the hose brackets I already had to bolt on the axle tubes. If I were a smart man I would have welded these on when I had the sway bar brackets welded. But I will use turbo hose clamps to mount them for now, maybe later I will get them welded on.
March 24, 2014
I give up!! The new calipers arrived today and of course one of them is messed up. No clue how they managed to get the pads in because the mount is obviously the wrong one. It’s not the whole caliper that is bad just the mounting bracket and the inside pad fell apart, probably when they tried forcing it into place. I have contacted the vendor, we’ll see how long it takes to straighten this out. The good news is that these caliper will work with rotors I have. Here’s something strange. I just got back from Oreilly’s to see if they had the correct mount. They have the same one that does not work, someone in China is making the part wrong!!!!!
March 25, 2014
I started modifying the axle flange caliper mounting bracket only to discover I can’t use it at all. The way this bracket mounts on the axle flange the caliper hits the torque link bracket. I am now in redesign. Using the old bracket as a template I will make a new one that moves the caliper around the rotor towards the back giving clearance for the torque link bracket. The biggest problem I have had is trying to mark the actual caliper mounting bolt holes. There is no way to see exactly where they should go and no way to get a scribe in there. So I made a temporary bracket and guessed. Close, but it took a lot of grinding and filing to get the holes in the correct spots. I will transfer this temporary part to the real one as soon as I am satisfied I have everything accounted for.
March 26, 2014
The mystery of the mounting bracket on the calipers continues. For some unknown reason the caliper mount has changed or maybe the vendor I got these from has less of a clue about these calipers than I do. All I know is the left one I have seems to work and the right one has a different bracket and the pads will not fit. And the vendor I bought these calipers says his whole stock of right calipers is the same as I have now. I will send these back where they came from. I ordered and another set from a different vendor hoping at least both calipers will be the same and the pads will fit into the bracket. If not I don’t know where I will go from here. Drive around with no rear brakes?????????
March 28, 2014
The second attempt at calipers arrived today, well the right one came today. It was shipped directly from Cardone and guess what? Yep, same bogus caliper mount. But it appears the pads are different and the anti-rattle clips are installed on the inner pads, they were loose in the box on the other set. So it appears if you use the correct pads with these mounts all is good. Of course that means the hours I spent making the bracket to mount the caliper was a waste of time! Hopefully the left caliper when it arrives will make a matched set. According the FedEx it should be here tomorrow.
March 29. 2014
The left caliper came today and at long last I have a matched set. No clue what was going on with the first set I got other than they were totally wrong. So what I have ended up with are 1994-2004 Mustang GT rear calipers and 10” solid rotors. I spent several hours in the garage today modifying the first axle flange to mount the right caliper. I certainly am NOT a mechanical engineer with the proper tools for this. There was a lot of test fitting, cutting, grinding and filing before I got the caliper to sit off the rotor and be centered on the rotor. I pulled the caliper still attached to the axle flange so I can attempt to make another prototype without elongated holes before making the real part. I will also need to make a 1/4” spacer for centering the caliper on the rotor. I picked up two pieces of 5”x7” 3/8” steel to make my final parts. Cutting that with my angle grinder should be fun!
April 1, 2014
I was able to sneak in a few hours on the bracket fabrication today. I made the Ľ” spacers needed to center the caliper on the rotors. Of course I am assuming the axle mounts I make will turn out with the same alignment as my prototype! The 3/8” plates I need for the axle brackets arrived today so I can start making them tomorrow. I only have two pieces of this stock, I will have to really think this through before drilling any holes.
April 2, 2014
I had success making the driver side axle bracket. Thinking about the best way to duplicate the prototype brought me to use the prototype as a jig. First I drilled the three axel mount holes in the new bracket. Then I screwed the prototype and the new bracket together with the spacer in between. Using a ˝” drill bit in my drill press I marked the center of the caliper mounting holes drilling though the spacer. This worked out prefect. Then the nightmare of cutting out the area to fit around the axle. I drilled a series of small holes along the curved line for the axle and used my angle grinder to cut as much metal out as I could, cutting 3/8" steel takes some time. Then I used a grinding bit in my Ľ air grinder to fine tune the opening until it fit, that took quite a while, I repeated that method on top of the axle bracket for relief of the caliper. I also had to cut a small relief on the spacer for the axle flange. Making the second bracket was much easier, I simply used the one I just made as a jig and the holes came out perfect.
April 3, 2014
Drilling the holes in the second bracket yesterday was easy, but there was still the matter of trimming all that 3/8” metal. It was going fine, slow but fine, when my angle grinder made a “pop” sound and died. You buy cheap tools, you get cheap tools, even though I've had that grinder for several years and its been worked hard. I don’t think a $29 angle grinder was designed to run for many hours cutting and grinding thick steel. A quick trip to Northern Tool and I was back in business. I finished the second bracket, cleaned both brackets and the spacers and shot them with some semi-gloss wheel paint. At long last maybe I can put this brake conversion to rest.
April 5, 2014
Finally at long last I have mounted the calipers for the last time. I torqued everything to spec except the torque links. I found it easier to mount the calipers to remove the torque link, of course that is not a good idea if you were simply changing pads. It’s possible to get the caliper on without removing the torque link, but getting a torque wrench on the top caliper bolt would be difficult. All that is left on this project are two hard brake lines and e-brake cables. Still no clue how I will handle the e-brake cable but the stock ones are definitely not going to work.
April 8, 2014
Brake lines! I hate brake lines. Over the years trying flare brake lines has not been one of my strong points. So before I attempted the next step on the rear brake project I spent some time on youtube.com getting tutorials. Once again it seems so simple and this time it was, no clue why I had had so much trouble in the past. Of course this whole thing could not go without some difficulty. I had the old brake line that runs over the diff housing but it is 3/16” and too long plus it needs to be Ľ”. A total failure trying to bend steel hard lines drove me to use the copper/nickel alloy hand bendable lines and that worked great. I ordered Lokar EC-80FU universal e-brake cable kit to replace the stock secondary cables, hope that works out. I pulled off the stock cables in preparation of the Lokar setup. Next is purging the rear lines to get all the old fluid out before bleeding the new calipers.
April 16, 2014
I took the cap off the distribution block on the firewall to pull the plunger that activates the brake warning light. I was surprised to find no plunger at all! I guess that explains why I never got a brake warning light when I had the front brake issues. I then disconnected the rear brake line just before the new proportioning valve and sucked out as much fluid as I could. The old fluid was almost black, looked like that stuff had been in there since 1970! After connecting everything back up and checking to be sure all the fitting were tight I started filling the rear brake system again. But of course I have a leak. Seems that Wilwood proportioning valves MUST have sealed adapters on both the inlet and the outlet even though it looked like my flared fitting on the outlet fit. After I got the adapter I started attempting to suck all the air out of the lines and calipers but so far I have been unsuccessful. Have I mentioned how much I hate bleeding brakes?
April 18, 2014
Another attempt at bleeding the brakes. Maybe I should recruit help and just do this the old fashion two person way. But it seems to have worked this time, at least the pedal feels as good as it did before. I put the wheels back on and noticed one thing the wheels sit father out that they did before. That is not a bad thing, remember I had added spacers to bring them out and it looks like I won’t need them now. A combination of the Moser axels, the much thicker brake rotors compared to the old drum backing plates and the change to 235x60-15 tires gave me the look I want. But it is raining so I real test drive will have to wait a few days.
April 21, 2014
The sun has been out in Georgia for two days and the side yard has reasonably dried out. Time to test the brakes! It seems like everything is working although the brake pedal does have a lot of travel. I’m still not sure about the bleeding. Also I need to measure the pressure between the front and rear since I have installed the adjustable proportioning valve. I ordered a pressure gauge so I can get accurate reading on the brake bias.
April 27, 2014
Dammit!!!! I bled these brakes, front and rear, many times but yesterday the pedal to the floor thing came back! They did that before I did all this work on the rear brakes so I am thinking master cylinder. As always there are choices. Stick with the stock stuff or upgrade. Since I have converted to rear discs and newer technology calipers I decided to upgrade to a Wilwood master cylinder. Crazy expensive but with a 1.25” bore it will be plenty big enough to handle the four wheel disc setup. Hopefully I can get the car back into the garage soon to swap out the master cylinder and start the front brake upgrade. The other thing I will change on the brakes is to eliminate the brake warning block since it doesn’t work anyway. I will simply remove it and tie the brake lines back together with couplers.
May 7, 2014
The first project to tackle is the Wilwood master cylinder. I pulled the old unit off and removed the activating rod. It looks totally different than what Wilwood provided. The stock one is longer, has a seal and the end that goes into the booster has a mushroom looking end machined on it. I have no clue where I go from here. I guess I’ll ask on AMC forum, maybe someone that has done the conversion can advise me. The second issue is the front and rear chambers on the Wilwood unit and reversed from the stock unit. Looks like I’ll be making brake lines! I am attempting to measure as much as I can for this rod. It looks like the stock one will work perfectly. The depth to the piston of the stock pump and the Wilwood are the same. The distance from the flange to the part that goes inside the booster is the same. And if I add the Wilwood rod plus the rod extension they sent it’s the same as the stock one. So even though the Wilwood is sold as a “universal” unit it appears I may have lucked out. Of course from some research I have done the booster is the same one used on late 60’s – early 70 Corvettes so I guess it makes sense it would fit an AMC. Now for the brake lines themselves. The issue with the brake lines is they have different threaded nuts at each end! What was AMC thinking? Fortunately the Wilwood kit comes with different adapters for these lines so I just need to get the right 3/16” lines with the correct nuts. That will take care of the fittings at the MC but at the connection on the firewall for the rear brake line I will need an adapter since for some reason the line going toward the rear is Ľ” instead of 3/16” that come off the MC. I got the master cylinder mounted and the replacement brake lines made. Next thing to do is bleed the master cylinder and the brakes and see if that fixes my issues.
May 9, 2014
The master cylinder has been bled. Next I will open the caliper bleeders and let gravity do its thing until the brake lines are full. Then I will assure all the air is out using the standard bleeding procedure.
May 11, 2014
Bleeding brakes alone sucks, gotta find some gearhead buddies that live closer. The gravity method didn’t seem to work out, but maybe I just didn’t give it enough time. I backed off the proportioning valve, let gravity do its thing one more time, installed the speed bleeders, squirted brake fluid all over the garage and at long last I have pedal! A road test followed and I am impressed. This car did not really have good brakes from the time I bought it. Now the pedal is firm and I feel confident when I have to hit the brakes. Did the rear discs make a difference or was it mainly the master cylinder? I have no clue, I just know it is way better than it was before I started all this.
May 18, 2014
I have got to stop declaring victory so quickly. I took the AMX to a car show yesterday and guess what? Yep, brakes went to the floor again, WTF!!! This time I may have a clue. Thinking about when this happens and what is the common situation I think it’s the steering had been tuned very far if not all the way when I am either backing into or out of a parking space. A Google search produced a similar issue that offered suggestions that either the calipers are hitting something at full steering turn forcing the piston to retract or there is an issue with hoses being too short or faulty. The hoses are new so I don’t think that is the problem but it is possible they could be too short. A while back I did switch the calipers left to right to get the bleeders on the top so maybe the repositioning has caused an interference I have not noticed. I have also lowered the front suspension so maybe that is causing the calipers to hit the upper a-frame. Time for some intense investigation.
May 19, 2014
Well the intense investigation just led me to more confusion. The front caliper brackets are hitting on the upper control arms and I see no way to prevent that from happening. Since I didn’t install this non-stock caliper setup I don’t know if this is just the way it is or if the PO left something out, like a steering stop. But I have decided to just bite the bullet and have ordered the Wilwood front brake setup. I sure hope there are no surprises in store with the Wilwoods. This thread is moving to front disc upgrade.
June 28, 2014
The final step in this conversion was the e-brake. Since the drum brake cables would not work on the disc brakes I bought Lokar’s EC-80FU universal cable kit. It all went in place rather easily after I stopped over thinking the whole thing! I cut off the threaded end of the stock cable coming from the e-brake cable, looped it and secured it with a wire cable clamp. I’m not real thrilled using the cable clamp but it works. I the cut the Lokar cables to length as per the instruction and it all went together rather effortlessly.
June 29, 2014
As usual I am not happy with the cable clamp so I came up with a better solution. Using the Lokar cable retention block as inspiration I made a similar block for the stock e-brake cable. The difference on this new block is I drilled a hole in the block for the swivel pin on the Lokar clevis assembly instead of relying on the cable loop. Like the Lokar block there are two set screws to hold the cable secure.