 |
||
|
Home Pictures Upgrades Custom Interior |
| |
||
|
Home Pictures Upgrades Custom Interior |
May 29, 2017
I started out just to lower the truck and refinish the bed floor. But things in life rarely go as planned! The plan is to remove all the clear coat the PO put on, paint the bottom well with black paint, use a dark stain on the top exposed area and then clear coat everything and polish the exposed areas.
May 30, 2017
My plan all along was to refinish the wood bed floor and exchange the painted rails for polished stainless ones. The PO had used Loctite on the bolts holding down the rails. Trying to loosen them resulted in rounding the square holes in the rails making removal a nightmare. I basically had to cut almost half of the bolts and rails to get them out. Other than time and work it is not that big of a deal since it is all getting replaced anyway. I did use an air wrench in my attempt to remove the nuts, that might have cause the problem, but I’m blaming the Loctite! I got all but three of the boards out and am exhausted, tomorrow is another day.
May 31, 2017
Man, I’m getting old. A good night’s sleep did not help yesterday’s exhaustion. But I carried on, at least for the morning. I got the last of the boards out of the bed. I now know why one of my buddies told me it would be easier to remove the bed, there are some nut nearly impossible to get to. I also screwed up when I cut the welds on one of the side trim pieces thinking it was something the PO had done. Now I’m going to have to find a new one but will probably bolt it on rather than having it welded.
June 6, 2017
I started sanding and painting the bed floor boards, this was going to take some time due mostly yo space! I also removed the rear roll pan that the PO had cut a large section out for the trailer hitch which I had removed. I had debated on fixing the existent one or getting new one. Getting the old one out was not that easy. It was welded in on the fender ends and it was tough cutting anything in there to cut the welds loose but I finally got it out. A new one with a license plate box for only $123 delivered was a no brainer. It does have some exposed spot welds that will need to be smoothed but that’s okay. I found a little surface rust starting after I pulled out the old pan. I sanded all the paint off and applied POR-15 to that whole area.
June 7, 2017
I test fitted the new rear roll pan only to discover the rear cross member needs to be notched to clear the license plate box. Okay, with that accomplished I tested fitment again. Closer but still not quite there. The whole thing needed to be slide to the right about 1/16” to get the top mounting screws to line up but the rear fender prevents that. Not being a body man I took that 1/16” off the roll pan rather than trying to adjust the fender. Only the little extension needed to be cut. Then since I can’t weld and didn’t want this thing welded anyway I made two brackets to bolt the ends to the bed sidewalls. I painted those brackets with POR-15. I then started the fill on the roll pan’s spot welds with RAGE GOLD.
June 8, 2017
Couldn’t do much today, other priorities ya know. I did get the rear roll pan brackets mounted and sanded off the first coat of filler for its spot welds. While I was under there I slapped some more POR-15 on the frame and cross members.
I am noticing more areas where rust is starting to rear its ugly head. The tops of the inside of the rear fenders and the bottom rear of the cab are going to need treatment. I will probably end up pulling the fenders to make fixing them easier and at that point the bed may come off too. Man, all I wanted to do was lower the truck a little, LOL!!!
June 12, 2017
OMG!!!!! Since I have seen some rust starting on the truck I thought I would pull the rear fenders and the bed to get to and treat the rusted areas. This seemed like an easy task but no-o-o-o-o! Aside from the 3 million bolts on the fenders the PO seemed to have a liking for red Lok-Tite which he applied in several areas. I had the use a huge breaker bar and bust the bolts to get them out. There is no major rust just where two pieces of body touch each other and trap moisture you can see it starting. I will use POR-15 and probably some seam sealer when I put it all back together. And NO LOK_TITE! One thing that surprised me was none of the cross member were welded to the frame, don’t know if that is how these truck were built. I will attack the inside of the fenders first before I pull the bed, just not enough room in the garage for a completely disassembled truck.
June 14, 2017
I did a little sanding on the floor boards to fix some mistakes I made the first time. I also sanded off the e-coat on the back side of the roll pan and applied two coats of POR-15. I still have a little body work to do on the outside but then it will be ready for paint.
June 15, 2017
I am still chasing potential rust. Today I did some more body work on the rear roll pan and took off all the paint on the bed step support brackets and applied more POR-15. Next will be the bottom of the steps themselves and then the inside of the rear fenders. But I will still have the bed walls to deal with. Man, I wish I had a media blaster! I also installed the upper shock relocation bracket. I wired the license plate light, that should end the wiring on this truck.
June 16, 2017
I got all the bed floor boards stained. It looks pretty good, I’m not sure if I will add a second coat. After some research I have concluded that you do not want to use automotive clear coat for stained wooden floor boards since it will cause the stain to lift and bubble. The recommended coating is marine grade varnish, like Sikkens Cetol Marine Gloss Finish. I want to wait to give the stain time to fully cure before adding the varnish. I thought I would address the bed steps and remove the paint from the bottom and apply some POR-15. That proved to be more difficult than I was thinking of course. I got one done but ran out of time and energy so the second one will half to wait.
June 17, 2017
I got the other step sanded and POR-15 applied. After one more try at filling the spot welds on the roll pan I shot some etching primer on it. As usual my fill skills are lacking, I have more work to do. The next big project is to remove what undercoating and paint there is on the inside of the rear fenders and treat them with POR-15. A little surprise was found on the driver fender. It looks like in its former life this truck had the fender mounted spare tire. There is a huge patch panel where that tire carrier would have been. I took off the fender braces and cleaned them and tried hitting the fender with my abrasive wheel. The undercoating somewhat came off but there is a layer of goo that did not. Gonna have to come up with a different plan!
June 18, 2017
Well that was fun! Today was rear fender inside treatment day. As it turned out there wasn’t much undercoat inside these fenders, in fact there was barely any paint. I looks like the PO did apply silver paint but did not clear coat it. This could explain the surface rust that was starting. I used an abrasive wheel on my angle grinder and moved it around a lot so as not to generate any hot spots. I followed that with 60 grit sand paper and was able to get one fender clean. I took a lot of POR-15 to cover it but one down another to go.
The plan when I got up this morning was to sand and paint one of the inner fenders. I accomplished that but then I went back into the garage and thought “do I really need to call someone to help get this bed off”. I checked out what held what together and decided I can disassemble this by myself which will make it easier to work on. I pushed the whole bed toward the rear to get better access to the 10 bolts holding the front panel to the sides and the rear cross member fell out! It was just slide into the rear side caps. No bolts hold this in place other than the bed mount bolt? I find that hard to believe, then again it was 1967. Well, it is all off the truck and there is some rust starting on the flange at the bottom of the front panel, that should be an easy fix.
June 19, 2017
More sanding and POR-15, this time on the rear cross member and the rear bed panel where it meets with the side panel front caps and both sides of the flange where the wood floor sits.
June 20, 2017
Not the plan this morning but I started on the second fender. This one is going to be harder. I attacked the mounting surface first and discovered some filler and several welds which were not threated and were rusting. At the front bottom there is a small patch panel again with rusty welds. But I got it down the bare metal and applied POR-15. The hole the PO drilled for a fuel filler was not even painted and had rust on it as well as on spot under the bezel. There seems to be much more undercoat on this fender so removing that and the surface rust will take more time.
June 29, 2017
I decided to address something that has bugged me since I bought the truck. The body work on this truck is marginal at best. That is the reason for all the potential rust issues I am dealing with. The tailgate “fixes” is driving me crazy. There are two welds which I assume patched some holes but the builder didn’t bother the grind them flush before he painted. Of course they are on the inside corners where the outside frame meets the raised panel part and not that easy to work on. I was able to get my small grinder in there and smooth the welds. But upon close inspection I see the same seam rust issues. I used a small file to dig out any paint in the seam and slapped some POR-15 along the seam hoping it will penetrate and stop any further rust, probably not. But I am going to paint the lower portion on the inside panel black and get some black vinyl letters for the logo. I will probably treat the front bed panel to the same paint scheme.
June 30, 2017
I sort of fixed the scars on the back of the cab I created when the bed front panel fell off the bed unattended, stupid me. The paint I used matches very well but because it is a clear coat paint job I really don’t know how to blend it. The areas will be hidden for the most part but I would like it to be as good as possible. Hopefully some sanding and buffing will help. The tailgate project is progressing. I got the filler primer on and sanded. I re-taped and applied another coat and plan on putting on the satin black tomorrow. The block letters came today so that will be another adventure. If this works out I will do the same thing on the front panel. I have started the temporary assembly to figure out exactly where the side panel angle brackets will sit. First I put all the cross member supports in place. Then I bolted on the step hangers to the front cross member. With any luck I can put on the sides and mark where the angle pieces will go, then take it all apart again.
July 1, 2017
The tailgate came out fairly decent for someone that is not really a painter, I will wait a few days before attempting the vinyl lettering. I started on the front panel. I’m making a little change for the front panel. I am still making the outside portion black but I am also making the entire inner portion black as well since there are no letters to break up the silver.
July 2, 2017
I got the front panel all taped up, applied etching primer last night and applied the filler primer today. I will let that sit overnight and paint the black tomorrow. Patience has never been one of my qualities so I put the vinyl letters on the tailgate today. After reading some reviews on how to do this I had a plan and it all went well. The scariest part was getting the letters free from the sheet, LOL. We’ll see how it looks in the morning after all the soapy water evaporates.
July 5, 2017
Very little accomplished today, I must be getting lazy! I sanded on the roll pan and did what I hope is the final fill on the welds. I sprayed filler primer on it and it looks like it is ready for paint.
July 23, 2017
I made some templates for the embossed panels I am trying to add to the bedsides but ran into a major issue. One of these side panels has had major surgery with a weld across the entire height of the panel in the center and the panel is badly warped. I knew it was but was hoping bolting the 1/8 strips would pull it flat, it didn’t, not even close. So I tried to see if this is going to work on the other bedside….nope, its warped too. At this point I am giving up on these bedsides. I will head down the road to AMD for get new ones. Hey, its only money right!!!!!!
July 24, 2017
I picked up the new bedsides from AMD today. I made the embossed strips for the left side and they fit great. I had to adjust them from my previous template since these bedsides have those bead rolls in the wheel opening but that will just add to the look. I still have to shape the corners and glue them on but so far I’m happy. I test fitted the fender and it looks like I will need to “adjust” a couple fender’s holes to get it the fit easily.
July 25, 2017
I made the final prep for this side on the embossed strips by curving the outside corners and slightly beveling the edges. After one final test fit I got the courage to glue them on with 3M 08116 panel adhesive and secured them with a bunch of bolts. Hopefully I will be able to get the bolts back out without difficulty! One thing I noticed, these bedsides do not have the holes for mounting the tail lights. This side still has a little body work to do on some spot welds and smoothing the edges of the embossed strips where they meet the bedside. Then I will flip it over and address the other side of the spot welds.
July 26, 2017
The bolts came out without any problems. I sanded everything well to get rid of any adhesive that squeezed out, scuffed the e-coat and laid down some etching primer. I refilled a couple of the spot weld areas that needed a bit more work. I will start “shaping” the embossed strips to make them look like they are really embossed.
August 1, 2017
You know how things in your mind sometimes seem easy? “Shaping” the strips was a lot more work than I thought. I used dura-glass to get the blended bevels on all eight edges of these strips and then started sanding. It all was working great until I got to the inside corners. That was much tougher. Then it was re-prime, fill voids with Rage Gold, sand, re-prime only to find more voids, fill again, sand and re-prime. After many rinse and repeats I finally am happy with the inside. I flipped the bedside over and started body work on the outside. I sanded the spot welds and filled them. I applied etching primer to all those areas. I again test fitted the fender and marked the inside area. I then sanded off all the e-coat in that area and applied POR-15 for some protection. Then I laid on the filler primer, sanded that with 120 and 400 grit and declared victory.
August 2, 2017
This was a lot of work and I have another whole bedside to do and final paint seems a long way off. I may be a glutton for punishment but I bought primer/sealer, Toyota Titanium Metallic base coat and clear coat. I am going to attempt painting this myself. I will paint the roll pan first and see how that goes before trying the bedsides and fender.
August 4, 2017
Today I started on the other bedside. I got all the strips cut, holes drilled and the outside edges curved. Tomorrow the plan is to remove the e-coat in the areas where the strips will sit so I can glue them in place. Given enough time and engery I will start the body work on the spot welds.
August 5, 2017
These new bedside have stake pockets which I assume were a stock feature on the 1967 C10. I don’t want them so I made some patch panels to eliminate them. Since I don’t have the ability to weld and don’t really want to lug these things to my welding buddy I made some brackets that mount inside the end panels. I glued them in place with the 3M adhesive and glued the patch panels to those. A little body work and the pockets are gone.
August 7, 2017
I guess I forgot what a PITA making these embossed panels was. I got the panels glued on and let it sit overnight. This morning I applied the dura-glass to the edges and let that cure. Sanding them into shape took hours and of course there are tons of voids I will have to address. But the hard part is done. My hands hurt from all that sanding so I moved on to covering the parts on the inside that will not be exposed with POR-15.
August 8, 2017
My hands are in shreds and my shoulder is trashed!!!! But the second stage of body work is done on the embossing stripes and I have laid down the etching primer. But of course even before the primer dries I can see I have more body work to do. I will put on some filler primer and we will see after this dries how bad it is.
August 9, 2017
Before I put on the filler primer on the inside I flipped the side over and did some body work on the outside. I test fitted the fender and marked out the wheel opening area for POR-15 and applied it. I also installed the end caps for the side panel rolls.
August 10, 2017
I taped off the POR-15 area, sanded the outside with 120 grit and laid on the etching primer.
August 11, 2017
After etching primer dried I applied the filler primer. I still have to sand both bedsides to see if I need to do more body work but I’m thinking this is as good as I can make it with my limited skills. As I said earlier these bedsides do not have holes for the tail lights, that could be because I don’t think the tail lights I have are from a 1967, I think they are from a 1966. But I like them so I measured the old bedsides and drilled holes and installed nutserts in the new ones for the lights.
August 12, 2017
One of the reasons for all this body work and new parts is because of the way these trucks were built. There is way too much metal to metal contact with no rust protection and no seam sealer. After all these were farm trucks back in the day. I allowed POR-15 to seep into all those contact points the best I could and added filler to all the seams on the bedsides. The front bed panel bolts to the bedsides metal to metal, I will be adding a gasket on the back of the bedsides. Also the top rollover ends of the front panel is opened and just butt fits to the bedsides. To eliminate any chance of moisture getting in there I made some plates that will sit flush inside the rollover ends. They will be glued in with 3M adhesive and sealed. I will add a gasket to those as well to eliminate the metal to metal contact.
August 16, 2017
I have done about all I am going to do on this bed so I guess it is time for paint. First I need to clean out the garage of all the dust and crap from the body work. Plus there is so much junk left over from the AMX, this truck and other projects in the garage I may make a trip to the recycle place first. To create a “paint booth” I will use the same method I used for the Z. I will put plastic sheets on the walls to protect tools and stuff, and put builder’s paper on the floor to keep dust away. I need to put on primer/sealer before I attempt the silver base coat.
August 17, 2017
For a bit more protection on the inside of the fenders and the fender area of the bedsides I put on a couple coats of POR-15 bed liner. This stuff is water based and made to go over POR-15 rust preventative which I have already applied. Unfortunately I should have applied this right after I applied the POR-15. Since it has completely cured POR-15 tech support told me to scuff it with 150 grit before I put on the bed liner. You need to apply two coats and there is a 3 – 4 hours wait time between coats and a 24 hour handling time. So this will take some time. I did the wheel wells first and then the bedsides and the roll pan. Tech support told me I can add more any time so after I get it all on the truck I will add some to the seams between the bedsides and the wheel wells.
August 25, 2017
For some unknown reason I decided to put the wood bed floor back on the truck before I install the bedsides. I read an article about doing it this way and it seemed logical. Getting all the boards and polished strips in place and lined up was a major task. I think the PO may have made these floor panels because there are only six frame mounting holes and every other wood floor I have seen use eight. For those extra mounting points I made brackets that mount to the frame and support the floor. I drilled two more holes in the wood panels, I wish I would have thought about this before I refinished the wood. In addition to these braces I added a couple 1/8 x 2” plates under the floor in two places running across the center section of the floor using the strip bolts to hold them in place. This does add a little more rigidity to the floor.
August 27, 2017
One thing I am still worried about is the rear wheels fitting now that I have lowered the truck. But the front bed panel has to be put before the side panels can be bolted on. The on-line instructions say to get a buddy to help. Anyone that knows me that is my last resort! With a cleaver system of 2x4’s, some clamps and Gorilla tape I was able to get it attached. Would it have been easier with help, oh hell yes! Unfortunately this pointed out an issue with the polished carriage bolts I bought. I either lost one of the Ľ bolts into the truck or I am one bolt short. I doubt I can find anything like this local but I have discovered it is really not that tough to polish these things. To avoid possible damage to the bedsides I will have one of my buddies come over to assist me getting the bedside and fender on to check for clearance.
September 11, 2017
After much too long I finally got the bedsides and fenders temporarily put back on. It did not go well. There were some “tolerance” issues with one of the bedsides but I was able to adjust to fit. All this still needs painted but before I do that I wanted to check for wheel clearance. Good thing I decide to do this because there are a few problems. The driver side tire is less than a half inch from hitting the bedside while the passenger tire is several inches away. Obviously I have done something wrong or the truck has a bent frame. I removed all the bed to frame bolts and shifted it all around to get the bed to sit square in relation to the tires. With that accomplished the bolts for the rear cross member are way off. At this point I am confused.
September 16, 2017
To get a little more clearance between the bed and the cab I bolted 2” angle brackets inside the frame that protrude about 2 inches past the end of the frame and bolted the rear cross member to those. Never having worked on one of these truck before I posted on the message board if it was possible to “slide” the rear end over the get proper spacing for my rear tires by simply loosening the U-bolts and pushing the whole thing over about an inch. The only answer was to adjust the panard bar! They also said to use a ratchet strap to pull the assembly to center. Since the panard bar only has an adjuster at one end. It took several attempts but eventually I got it perfect.
October 16, 2017
I have no clue where all the time went. A month has passed and it seems like everything I have done on this truck has been repeated a multiple of times. Much of my problems stem from the PO’s build. His non approach to rust prevention, his selection of the fuel tank, the fact the wood floor was not put in properly, the exhaust system welded to the frame making it impossible to move without cutting it out, the use of who knows what body parts that are certainly not 1967 and the idiocy of the wiring. But I am slowly making headway. With the help of a friend I pulled the fenders and bedsides off yet again to address the floor fitment issues. I have done some more cleanup of the body panels in preparation of paint. I think the last thing I need to do is realign the bed cross members so the mounting bolts will sit straight. Since the wood floor was already drilled and installed incorrectly I need to adjust the holes in the cross member supports.
It took days to clean out the garage, amazing how much crap you can accumulate over 6 years! Another two days were spent transforming it into a “paint booth” but it is time to put some color to this bed! I hope I am not going to regret attempting this paint job myself. The first thing I need to figure out is how I am going to get all this stuff positioned so I can paint it. The ceiling in my garage is way too high to think about hanging stuff. I built some platforms to hold the bedsides and my work surface will work for the fenders. A small table will hold the roll pan and a modified chair will hold the steps while I paint. I will put the primer/sealer on everything at once. But for the silver and clear I am going to paint the roll pan first just to see if I can actually pull this off. If the pan comes out decent I will move on to the rest. I can’t think of anything else to put off trying to paint.
The primer went on pretty well. I will do some smoothing of it before attempting the silver. I have to get new nozzles for my paint gun since all I have is primer sizes.
October 20, 2017
I am an amateur painter but as scared as I was I attacked the real paint this afternoon. Like I said I am only painting the roll pan as a test bed. I used a 1.3mm nozzle for the silver and it laid down pretty nice. I put on three coats. I let that dry for about an hour, cleaned the gun and mixed up the clear. I used the same 1.3mm nozzle for the clear and shot the first coat, looked nice. I let that sit for about 15 minutes and started the second coat but the gun went empty! I had mixed and almost twice what I did for the silver, I guess clear goes on faster even though I used the same gun settings. I mixed some more and finished the second coat. After another dry period I shot the third coat. I did notice what I hope are just dust in the clear, we’ll see after this all dries and I can hit it with sandpaper and buffing. But so far I am happy, the only run I got was on the outside corner bottom and should be easy to smooth out.
October 21, 2017
Today I painted the steps. The biggest issue I have is the weather. Fortunately it is warming up past 65 in the afternoons so I can paint. But laying down three coats of base and three coats of clear takes about 3 hours with gun cleaning and dry time. At this rate this is going to take some time.
October 22, 2017
Cold weather with rain is headed for Georgia tomorrow. If I don’t get this thing painted today who knows when it will warm up again. So this morning I taped off the bed sides and started shooting the silver. But it quickly became apparent that I was going to run out of paint AGAIN! I decided to get only one bedside done. I will head to the paint supplier again tomorrow and get more. I still have one bedside and both fenders to do so I am thinking two more quarts of each base and clear, this is getting expensive, LOL.
October 25, 2017
Doing the bedsides will allow me to partially put the truck back together before I paint the fenders. Of course the inside of the bedsides are getting a two tone paint job so that will take some time. Today I got the second bedside painted and cleared. I got one run just as I was about done with the second one and of course it is on the biggest panel but it should sand out easily. I was really surprised how much paint this is taking. I have about one and a half quarts to do both fenders, hope that is enough but I don’t think it will be. I will do one just to be safe.
October 26, 2017
The biggest and most complex parts are next for painting, the fenders. I still have no handle on how much paint these individual parts take so I am only painting one fender today, hoping I will have enough paint to do the other one tomorrow.
October 27, 2017
The final silver/clear in on. Now for the scary color sanding. There are some dust particles but fortunately there are only two run, one small and one fairly large. No clue how the large one happened but I might have hit the same area twice on the third coat of clear. Hopefully I can get it flat without too much trouble.
November 1, 2017
Color sanding is not fun. This is my first time at attempting this so I approach is with some trepidation. As with painting I started with the easiest part to fix if this all goes horribly wrong, the roll pan. There are some dust particles to deal with. I started with 800 grit paper and then moved to 1500, followed the 3M Perfect-it 06060 Extra Cut Rubbing Compound on my D/A and finally with 3M Machine Polishing Compound. It came out pretty nice. So I moved one to the bedsides which proved to be more difficult due to their size and shape. The large run took a lot of time to eliminate and I did burn through a small portion of the bottom edge, that will have to be touched up. I then taped off the inside fabricated raise panels and laid on three coats of the matte black.
November 2, 2017
Today I tackled the second bedside. I sanded all the clear with 800, followed by 1500, the Extra cut compound and then the Machine polish. And finally the inside fabricated raise panels got the three coats of matte black. This went much better than the first one, experience counts I guess.
November 3, 2017
I got both of the steps polished today but it looks like my luck on this project has run out. The last pieces to finish are the fenders and they have problems. I don’t know if it is dirt or other contaminants but there are several large areas in both fenders that have debris in the clear that will not sand out. So I am going to have to sand it down and repaint.
November 6, 2017
I got both fenders sanded and ready for paint. Before I repaint I want to get the bedsides installed on the truck. But before I can do that I need to fix some paint damage on the back of the cab. The main problem was a result of painter’s tape I put on to protect the cab during disassembly. When I took it off it pulled off the clear and base in an area about 2x3 inches near the lower corner, how’s that for irony! Trying to blend the paint is intimidating but I am going to give it a shot. I have sanded the areas with 320 and primed so I will have something for the base and clear to stick too. I have shot three coats of base and will shoot the clear after it dries.
November 8, 2017
Well that did not work. The paint does not match, weird because the other parts I painted match pretty well. I did use a different primer and maybe that was the cause. Regardless I am moving on and as soon as my buddy can come over I will start to put this thing back together, at least getting the bedsides on. I will address the cab later.
November 10, 2017
There is going to be a slight delay before my buddy is available to help with re-assembly so I attacked some other things. I got the steps mounted and put on some rubber gasket material for the metal to metal areas where they meet the bedsides to help prevent the rust that had started after the PO painted the truck.
November 11, 2017
I did some more prep work and got primer on the rear fenders today. I will do a little finish sanding on those tomorrow and if the weather cooperates I will put on the silver and clear.
November 12, 2017
This morning I heated up the garage to 55-65 degrees and laid down the silver paint. It all went well until after the third coat a big particle showed up on the driver fender. I allowed the paint to dry for an hour and used a pick to remove the offender and touched it up. But evidence of the particle is still showing, guess I will just have to live with it. Now for the clear. I waited a couple hours before applying the clear to allow the garage get to 75-80 degrees which is the spec on the hardener I have. I put on three coats with NASCAR and NHRA as wait time between coats!
November 13, 2017
Well that finishes the painting other than color sanding which will have to wait until the fenders are totally cured. My buddy will be coming over in the morning to help me put the bedsides on…….AGAIN, hopefully for the final time. I need to get the truck back in the garage, remove the wheels and prepare everything for the install, he has a limited time window tomorow.
November 14, 2017
Today is the start of re-assembly. I got the garage and truck ready so getting the bedsides install should go easily. In an ideal world I would assemble everything at once but the fenders need color sanding and I think that will be easier if they are off the truck. All in all it went pretty smoothly. We had a few issues getting some of the bolt holes to line up but eventually got the bedsides and the outer floor boards on. I had to do a little alignment to get the bedside square so the tailgate will fit. I need to get the rest of the floor boards installed, put on the roll pan, the tail lights and tailgate.
November 15, 2017
I got the steps aligned with the bedsides and bolted in place. I started to install the rest of the floor boards but that is a lot tougher than I thought it would be, there is little room for error. Plus the gas tank and filler hose make it impossible to get at the nuts for the stainless strips. I thought I had this figured out but maybe not. I will step aside the attack this later.
November 16, 2017
Dawn greeted me with a new attitude. Well at least with new hope. I started on the bed floor again, this time I loosened all the bolts I had previously installed and carefully aligned the boards, that worked! But it still took over five hours to get the floor in alone. Damn carriage bolts are not designed for a one man operation and there are sixty three of these things! In hindsight I think it would have been much easier to build the bed completely and then get some strong friends to help put it on. Oh well, it is on with only some minor things to finish.
November 17, 2017
Minor things! Did I say minor things? Yeah they were minor but took some disassembly to do it. I had four more bolts on the outside boards to put in but the two front ones were not accessible because of the step brackets. With the right tools or smaller hands I may have been able to get the nut started but I had to remove the steps and brackets to get at them.
November 20, 2017
I did a few cosmetic things today. I installed fake black socket bolts in the silver embossed bedside strips that will not be fender mounting bolts. I added some pipe to the fuel filler to get it positioned for the fender connection. After we got the bedsides installed and I have been looking closer at the paint I realized the passenger side bedside outside was not up to the rest of the paint. I tried color sanding it again but I am going to repaint it. Not fun since it is already on the truck so masking everything took a long time. I pulled off the step to make it easier and sanded all the silver portions with 320 to get it prepared for primer. Fortunately there is not much area to paint and I can break it at the top roll.
November 21, 2017
Short day today. I got two coats of primer on the bedside. I will let that sit overnight, sand it a little in the morning and then shoot the silver and clear.
November 22, 2017
As planned I put on three coats of silver and three coats of clear. Not real sure why but each time I paint the result gets better. Now after I finish up and couple things, like getting the step back on, I can recruit my buddy again and get the fenders installed. Time to eat some big bird tomorrow!
November 26, 2017
The big bird was awesome as was the company but now it is back on the truck. Of course I found something else I had previously chosen to ignore but now it is bothering me. On the embossed bedside strips I made two extra holes to mount and those ill not be needed for the fenders, plus it would look weird when compared to the other side. So I filled them which meant repainting the strips. I got that done over the past couple days so once again I am claiming the painting is done!
November 27, 2017
I want to give the new bedside paint a few days to cure fully before attaching the fenders. So today I reattached the step on that side and installed the rear roll pan.
November 28, 2017
I put the fake bolts back on the passenger side so it is time for the fenders and the tailgate to go back on. I have contacted my buddy to see when he is available to help.
November 29, 2017
Don was available today for a few hours to help put the fenders and tailgate on. I thought I would test fit the tailgate mounting hardware before he came over, good thing I did. Typical aftermarket stuff! Whoever welded the backing plate for the bolts must have worse depth perception than I do. I had to file the crap out of the holes to allow the bolts to pass through, gotta love filing on new paint! I hit the filed holes with POR-15, hoping it will be dry when we try to put the tailgate on. Getting the fenders on went well except for some reason the steps do not align with the fenders. Some investigation will be needed to figure out why. Then there is an issue with the tailgate. One side fit perfect but the passenger side latch fitting is hitting it’s mate on the bedside. Some adjustment will fix that. It is nice to see the truck looking somewhat complete again after all these months.
November 30, 2017
The misalignment of the steps was easy to fix, I simply loosened all the bolts on the steps and the mounting bracket and they fell into place. I guess I should have put the fenders on before I installed the steps, live and learn. I also go the fuel filler and the fender braces mounted. I “massaged” the tailgate latch on the passenger side to get it to fit.
December 4, 2017
I did get the latch to close but for some reason the tailgate will not close enough to get the chains to attach. Not a big deal I don’t want to put the chains on anyway. I used some screw type carabiners. I got the tail lights mounted and wired but am still trying to figure out a cleaner wiring loom for them. I got some nylon braided fuel line and run the wires through that. But I need to make something to cover up the back in the light pods.
December 7, 2017
Making the covers for the rear of the taillights was an adventure for sure. I chose to use fiberglass using a cardboard cylinder for a mold. Getting them to fit around the taillights was a trial and error endeavor. The first one went reasonably easy but for some reason the second one was much tougher.
December 27, 2017
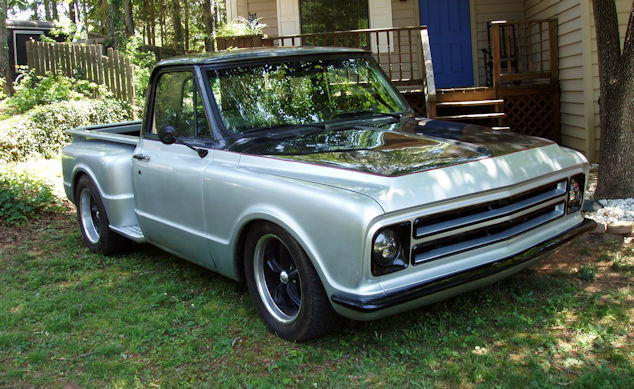
It has been a while, got involved on front brakes. But this project is 99.9% done. I still have an alignment issue with the driver side step but that is minor. I finally took the truck to the gas station and filed it up and took it for a short ride. Everything seems okay, the rear springs settled a bit so maybe I am good on the 3” drop.
This project became much more than I planned. It is hard to remember that the original plan was to simply lower the truck. But the escalated into changing the look of the bed floor which manifested itself into rust repair, bed frame engineering and a modified paint scheme. I also removed the unused trail hitch and added a new rear roll pan. This was also my first attempt at a major paint job. Am I satisfied? That is always the question anytime you modify a car. Yes, for the most part. I like the look of the truck’s new stance, it could be lower but for now it will do. Time to move on to another project.
January 30, 2018
The first time took the truck to get gas I noticed a problem. The tail lights are too high and the driver side ilght interferes with the gas pump nozzle from easily going in the filler neck. I had checked the old bed for the mounting holes position but something is different. It is too late to change the holes so I made an adapter out of aluminum to drop the lights about 4”. While I was at it I installed LED bulbs I had left over from another build.