 |
||
|
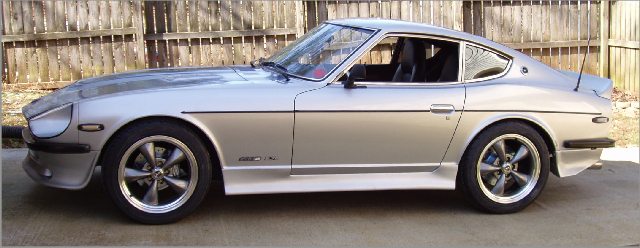
The Saga Continues Now that the new engine is in I was thinking I could turn my energy to some other projects. But of course fate had a few surprises for me. The first issue I noticed was the car pulled very hard at idle. The idle was a little higher at 900 rpm than the old setup up but I had to really stand on the brakes to keep it from moving at stop lights. It also caused the front brakes to lock on my smooth garage floor while the rear wheels were still turning. Something is seriously wrong. I was thinking maybe I had brake issues. I had never changed out the stock 280Z master cylinder for the preferred 280ZX so I decided to do that. And while I was at it make sure that infamous reaction disc was in place. I had an old 280zx master but it wasn't in the best shape so I took it to O'Reilly's for a trade in. I took the master cylinder apart to find the reaction disc was in place but epoxied it to the plunger anyway. It took some playing around to get the plunger and brake pedal adjusted right for the new master cylinder. I also swapped out the rear pads to a spare set I had. But all this had no effect on the problem. At this point I was lost and confused. After many agonizing miles not being able to put my foot in this thing I finally decided now was the time. The first pull form a dead stop was impressive for sure. This thing is much stronger than the old engine. The second stomp did not feel right. It felt like the tires spun badly when the tranny shifted into second. But it didn't take long to realize it wasn't tire spin but tranny slippage! Now its starting to make sense. I think something happened to the torque converter and it was locking up and that eventually took out the tranny. I searched around and finally found a rebuilt tranny from the same place I got my new crate block. It was actually the salesman's tranny he had just pulled out of his Camaro to switch over to a T56. It had all the goodies installed and included a Transgo shift kit, a 2800 torque converter and an aftermarket flexplate. I have proved you can get the tranny out of a 280Z V8 conversion without pulling the engine. Is it easier? Good question, but considering you have to drain all the coolant, pull the radiator, tranny cooler lines and all the wiring, yes I think its easier. Granted I had to lower the tranny in the back a lot to get at some of the bell housing bolts but it can be done and I did it alone. This tranny rocks. The high speed torque converter doesn't seem to change its drivability at all. The shifts are super quick and strong. But alas I have a new issue. The new tranny will not shift from 2nd to 3rd at WOT, OMG I have no luck. I called Eddie but he said he had never seen that in his Camaro. I called TransGo and they said either the 3-4 clutch is slipping or the check ball is stuck, whatever all that means. But to find out for sure the tranny has to come out, gr-r-r-r-r-r-r!!!! Our DNI event came up too fast on me to get the tranny issue sorted out. Knowing I was foolish I was hoping the shift problem was a one time thing and would not be a problem at the drag strip. So off to DNI I went. Lets jump back a few months to another issue I thought at the time was just a freak thing. I returned to Mississippi to attend a car show. On one of my fuel stops that car just shut off for no reason. But it started right up and was never a problem again. Not until two weeks later when it got real bad, even dying at a light and refusing to start for several minutes. I got the car home and started investigating. I couldn't find anything wrong but now the car wouldn't stay running for more than a few minutes. I took off all the ignition connectors to make sure they were clean and seated. After some internet research I swapped out for a new TPS and cleaned the MAF. It seemed to fix the problem and I felt confident to head out for DNI. All was going great for the first 100 miles. The sun was out, it was a warm day, traffic was light and I was cruising along at 80 mph. Then the car seemed to miss a little. Naw that did not happen. Then it did it again a little worse, then it died! I got it started but only for a few seconds and had to bail out before I got run over. I was dead on the side of the road only 20 miles from our motel. A good Samaritan stopped and gave me a local phone book and some suggestions on garages and tow companies to call. With limited tools and being alone there was only so much diagnostics I could do. After a few calls I arranged for a tow truck but it was going to take several hours to get to me. About that time Warren drove past me honking his horn and pulled over. He had his car on his trailer so I was thinking I have been saved. The plan was for him to drop his car off his trailer car at the hotel and come back to pick me up. But about a mile from the hotel exit, his van's plastic end tanked radiator (Cheap Ford Crap) decided to let go with an 8" crack horizontally, shredded the serpentine belt, he barely made it to the hotel exit. Did I mention it was Friday the 13th? He sent one of the other guys at the motel to tell me the horrible news, seems he didn't have my cell number even though he said he did. Yet another couple guys were about 20 miles out and they also had a trailer. So they stopped and we were able to unload their car and put mine on the trailer. As it turned out my problem proved to be minor. The +12v wire going to the coil somehow broke off right at the connecter, can't believe I didn't notice that on the side of the road, especially since I had removed that connector to make sure it was seated well. I couldn't have fixed it anyway, the wire broke right at the connector. Warren was able to use his key making machine the remove enough plastic from the connector and give me enough wire to solder it back. Car fired right up. I have ordered new pigtails for that and the rest of the coil and ignition module. Well the tranny shift problem was NOT a one time thing. I found that out when one of the turbo guys wanted to race on the way to the track. Wait a minute! We're going the a drag strip but decided to race on the streets, hmmmmmm. Anyway the car bounced off the rev limiter every time 2nd gear topped out. But of course I decided to make a few passes anyway. Right away I knew the car could be faster but traction as nowhere to be found. It spun badly off the line and at the 2nd gear shift. Then at 86 mph there was the rev limiter. Time sucked, 60 foot time sucked, I was not happy. I decided not to push it and parked the car. I was talking to Paul Corson who has a badass Z with a 408 and a Powerglide tranny. He gave me the name of his tranny builder, Phillip Reagin. I called him when I got back from DNI. I decided to take my old tranny to him to build me a "bulletproof" tranny. I am not looking forward to pulling the tranny again but hey, its all part of the joy of hot rodding! You know how things go with hotrods. There is always that while I'm at it item or modification. Since I have to pull the transmission....AGAIN which means dropping the exhaust, and the driveshaft I have decided while I'm in there I might as well get the famous Ron Taylor differential mount. The Z cars are noted for that thump as the diff attempts to rotate under stress. The RT mount takes care of that issue much better than the stock leather restraining strap. I got the rebuilt transmission back but before I install it I wanted to do a little more investigation on this. I had already talked to TransGo, the shift kit people, but they were little help. So I talked to my PCM programmer about this. He lowered the shift points for 2-3 shifts from 70 to 65. He did it in all of the files 90-100% TPS. I reprogrammed the PCM and took it for a test drive. It is spitting rain here so this was exciting! I took off at WOT and after getting the rear end under control, first gear was very exciting, I was able to stay on it though 2nd gear. The tranny shifted at around 65 mph into 3rd, no problem. I have shift light (just in case I want to manually shift) set at 5800 and the tranny shifted right after it came on. I also tried manual shifting it to make sure that works too. I pushed it to 6000 rpm and it manual shifted fine. I installed the RT diff mount today. Of course to do that I had to drop the exhaust ...again. I pulled off the front rear suspension cross member to get at the front diff mount. Who the hell designed that thing? You can't get a socket or a box-end on the bolts and the damn things must have been put on with red loc-tight. I took my angle grinder and cut enough off the mount to get a socket on the bolt heads. I still had to put a box end on the nut and use a 3 foot pipe on the socket wrench to break them loose. At this point I realized I was going to have to remove my fuel lines to get the mount into position (fuel lines are not in the stock location). To make thing easier I also pulled the driveshaft. It was still a tight fit to get the mount over the diff and into position but it fits like a glove. I was able to get the fuel lines back into their original position, I was afraid I might have to route them different. I had to slot the Energy Suspension 3-1108 poly mount to line up with the mounting holes in the diff. But its all done and waiting for a test drive. While I was under the car I noticed one of the transmission cooler lines was leaking, these transmissions hate me! In order to get at the fitting I had to lower the transmission. Not a hard thing to do since I already had the exhaust and driveshaft out. But I forgot about one thing, the shifter cable. As I lowered the tranny I heard a rather loud snap! The shifter cable has a plastic housing that locks the cable into a bracket on the tranny, it broke. It will take some time before I get the new cable delivered. To change the cable I will have to pull the console, unsnap the broken cable and feed the new one up through the floor. Damn GM!!!! I spent 2 hours this morning taking out the console and getting the new cable hooked up to the shifter. Not a tough thing to do, just a lot of stuff to remove to get at the shifter. I go to hook the cable to the shifter arm on the transmission and guess what? It doesn't fit!!!!! So I go up to the local Hendricks Chevy dealer to talk to my buddy at the parts counter. Turns out in 1996 GM changed the shifter arm to use a 10 mm ball connector instead of the old 6 mm ball. The cable with the 6mm ball is no longer available. The cable I picked up on EBay is from a '96 Z28. So I got a new shifter arm from GM with a 10 mm ball, so the cable is back in. I think I pointed out somewhere along the line of working on this car that it would never really be finished. The main reason I bought it was to have something to play with in my retirement. In that vain I have decided to upgrade my wheels to a 5 lug setup. The idea is to get the wheels I have always wanted to have for this car. The look of Torque Thrust of the 60's -70's but with the size of today's larger wheels is the look I am after. Of course this is not going to be cheap. I need to source several parts. The first part is the front hubs. One method to make the front swap is to use early 5 lug 300zx front hubs. The big issue with this is the 3/4" outward offset created by these hubs. I think with the wheels I want it may be too much and the tires will hit the fenders. So I decided to go with Modern Motorsports billet hubs that have no offset. These are not cheap but you do get new bearings, seals and ARP wheel studs. It will also require new caliper spacers but I would have had to get those either way. The rears present more of an issue. The standard method is to modify the 280Z 4 lug hubs to 5 lug. I would have to remove my stubs and either send them to Modern Motorsparts or find someone local that could do it. I was not real comfortable trying to find some one local since this should require reinforcing the existing stub to add the 5 lugs. Modern Motorsports of course makes billet stub axles for this but they are even more expensive than the front hubs. But hey, its only money so I went with them too. Research has shown that getting the old stubs out is not exactly easy. It involves a large nut that is piened and if care is not taken you can ruin the axle threads. It looks like the best way to handle this is to remove the complete strut assembly and take it apart on the bench using an impact wrench. And then use a hydraulic press to get the stubs out. I also discovered that the later 280zx stub nuts are locking nuts and do not require piening. I picked these up for the install. After an intensive search I found American Racing Shelby Shelby Torq Thrust M wheels on sale in Anthracite which is a gray spoke color I wanted. I ended up choosing 17x8 with a 0 offset. The next issue was the brake rotors. I have seen others drill the rotors for the 5 lug configuration but I also heard that is a good way to crack the rotors. Plus for future brake work it would be nice to have real parts on the car. Some research reveled that the '84 300zx 5 lug turbo rotors are exactly what I needed. I once again went with slotted and drilled rotors, vented on the front and non-vented in the rear. With the new wheels being 8 inches my present 215 tires a little narrow. Specs say for an 8 inch rim you need a minimum of a 225 tire. After some research that will fry your brain on performance tires I decided to change from Falken brand to Yokohama. I didn't want to get crazy on tire size and selected 225/50-17 which only adds .4" to the width and height. Of course that means I will need to reprogram the car's PCM again. Hopefully all this will fit inside the fenders. After getting the tires mounted and balanced I picked up some GM duel threaded lug nuts. I am hoping I can use GM screw-on lug nut covers to hide the unused portion of these long ARP studs, I ordered a few used covers as an experiment. If not I might have to trim the studs to fit. It worked, now hopefully I can find 15 more to match these. All my parts came in from Modern Motorsports and they are awesome. But there is one issue I had not counted on. The wheels fit fine on the rear stub axles but the center bore of the wheels is not large enough to clear the front hubs. I took the wheels to a machine shop to have them machined to allow them to sit flat. These cars can be so stubborn. I started on the rears today. Since I had to drop the LCA anyway to get the halfshaft out I figured it would be easier to work on this thing if I just pulled the whole strut assembly, only 4 more nuts. So I get those out, get the stub axle nut off using a big ass pipe and drove the first stub axle out using the BAH. It came out with the outer bearing still attached to the stub and the spacer came out too. But the second one was more stubborn. It seem to hang up about 3/4 of the way out. I got more aggressive and it finally popped out. But the outer bearing, spacer, inner bearing and seal stayed in the strut housing. I got the inner seals out but am confused about how to get the bearings out. So I went to the source, Hybridz, and within 10 minutes had the answer. The bearings are the self contained style and do not have a separate outer race like the front bearings. I was able to use a punch to hit around the edge of the bearing and drive them out. Getting the outer bearing off the old stub was a little more difficult but eventually I was able to get it off. Not a big deal anyway since I'm not going to be using these stub axles. I chickened out on installing the rear bearings and stubs, I just don't have the equipment for this. I took the strut assemblies, stub axles, bearings, seals, new 280zx axle nuts and the companion flanges to Balanced Performance to have it put together. In the mean time I finished up the front conversion. My buddy Gregg came over this morning to help me put the rear suspension back in. All went well until I started to torque the outside rear LCA bolts. For some reason they weren't tightening. I suddenly realized there were not two different bolts holding on the LCAs but three. I knew that one side of the rear bushings use a fine thread and one uses a course thread, no clue why! What I did not realize was these fine thread bolts are shorter than the two front bushing bolts and of course the long ones were the ones we attempted to install on the rear. They were hitting on the mustache bar down support bolts. Did commonality of parts ever occur to the Datsun engineers? The bolts did not survive this, the threads were crushed. Fortunately they came out without doing any damage to the support threads. We took a short break for a run to the bolt store to buy new bolts to replace the two with crushed ends. Its always something, LOL. The next thing to do was to install the rear rotors and calipers. The 240SX caliper are a total pain to install because of the screw type pistons. You have to take the damn things apart and use a special tool to screw in the piston so you can install the caliper on a new rotor. After fighting that I was ready to install the rotors. As always there is a problem. The rotor would not sit down all the way onto the stub. As it turns out the billet stub axles have a center bore of 68mm (normal for a Z) but the rotors have a 67.1mm bore. I measured the center bore on the 4 lug rotors I had on before and they are 68.1mm...WTF!!!! I got these new rotors from the same people, somebody at the rotor making place is not checking their work! About 3 minutes with the dremel tool all was good. So the rear wheels are on. I took the car out for a test drive but it didn't last long. Upon exiting the driveway the car I heard a horrible crunching sound. I stopped immediately but the damage was done. The passenger side rear tire had hit on the fender bending sheet metal, cracking the paint and taking some tread off the tire. DAMN I was not going very fast. It might be time so some ZG fender flares. One other thing I noticed after I pulled back into the garage was the car sits about 1/4" lower on the passenger side. Some research indicates I may have a bad strut cap. It appears my worst fear has become a reality. Looks like the car will be off the road for a while. |