 |
||
|
|
The Transplant Begins
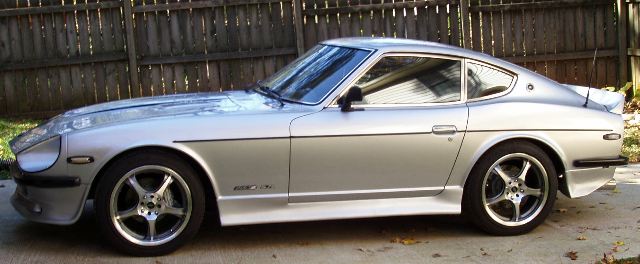
Well, its time for the heart/brain transplant. This is almost an entire rebuild for the Z. I will be changing out the suspension, adding the four wheel disc brake setup and the Gen 1 350/truck 5 speed are going into retirement being replaced by the 350 LT1/4L60E from the Z28 donor car.
The Grand Plan
First order of business was removing the old suspension and installing the new four wheel disc brake setup. After I get that installed I will test it all before swapping out the drive train. No point in having suspension and brake issues while trying to get the LT1 setup right. Next would be installing the JTR setback motor mounts and transmission cross member. The trial fit the LT1 and 4L60E. Followed by measuring the driveshaft length, getting it cut and installed. Then I will address the fuel system. My plan is to use the Z28 fuel tank, fuel pump and associated filters and lines. This will involve some fabrication and planning. After the engine, transmission, fuel and exhaust systems are set I will attack that massive wiring harness, eliminating what I don't need and adapting it to the Datsun harness. I will also investigate using the Z28 gauges instead of the old Datsun ones. I have had so many electrical problems it seems like a good idea to get rid of as much of the Datsun wiring as possible. Well now that seems like an easy plan, wonder what I'll do next year!!!! ROTFLMAO.
Once again fate steps in and deals me a blow. I have managed to mess up the rotator cuff on my right shoulder to the point that turning wrenches is extremely painful. After a few weeks of self diagnosis and treatment I went to an orthopedic doctor. Drugs and PT for many weeks has put this project on hold. After assessing it I have decided to farm out the suspension/brake conversion. As much as I hate to do that, if I want it done soon that's the only way its going to happen. So the day before the 4th of July I watched the mechanic drive my Z off to Balanced Performance to get the work done. As I watched my car disappear over the hill it did not make my shoulder or my ego feel any better.
Every once in a while things that seem bad work out for the best. Like I said suspension and brake conversion was new territory for me. Thank goodness I sent this job to the professionals at Balanced Performance. As it turned out what I bought for this conversion was not exactly what I was lead to believe. What should have been a relatively simple bolt-on soon turned into a nightmare.
Although I did get rear brakes and axels for a ZX, that suspension will not really fit in a 280Z properly. It seems to fit but in reality the ZX half shafts with CV joints are a bit longer than a 280Z half shafts with u-joints. This would cause the half shafts to bind on the rear gears and would have shortly taken out the rear end, thankfully I have a mechanic that knew that. So I decided to stick with the 280Z half shafts. Granted the CV joints are better and stronger but the expense and time needed to get adapters didn't seem worthwhile considering my intended use for this car. Next issue is the emergency brake cables for the 280Z and the hook-up for the 280zx are not compatible. Cliff had to make an adapter to hook the cables up.
Now on to the front end. Cliff noticed right away the was an issue with the steering, like it didn't work at all. He soon discovered the ball joints were installed completely wrong! Next problem was in the front Toyota caliper kits. As it turned out this was not right at all, not even close. The spacers were not the right ones for this setup. The hubs were 300ZX hubs, not the 240Z hubs needed for the spacers installed, so the hubs would not seat and the calipers could not be mounted. Of course the 280Z hubs would not work either. I was faced with several options. Mill the spacers to fit, which would be difficult since we didn't really know what that thickness should be. Attempt to get new spacers for the 300Z or 280Z hubs which proved difficult since all the sources we found would not sell the just the spacers. Or get 240Z hubs and bearings to fit the spacers I all ready had, this is the way I decided to go. This would at least give me all new parts. After this 4th setback Jason asked me "Aren't you glad you didn't try this conversion in your driveway", LOL!!! Obviously I would have been better off buying all new conversion kits than getting what I did. I should have done more research so I knew what I was buying.
One weird thing we discovered was the rear suspension had Honda wheel adapters on it. No clue why, but I should be able to sell those for a few bucks. Cliff, the mechanic has offered to buy my old stuff so I will get back some of the cost of the conversion. Cliff also noticed the rack and pinion in my car was seriously loose and would probably need major work, that pretty much explains some of that shaking of the steering wheel especially under hard braking. But the one I bought is fine so we're going to use that one.
Monday dawned with hopes of getting my car back. But then Jason called with more bad news. They got everything done and lowered the car but it kept going down, way below where it should have sat on the suspension. Can you say Low-Rider? There was little doubt something is just not right with these parts in this car. They started measuring things and comparing them with cars at their shop. It turns out what I really have is 240Z suspension parts with ZX brakes, not the ZX parts like I was told. The geometry is totally different between the 240 and 280, springs are about 3 inches shorter on the 240 and the struts are smaller. So tomorrow we go back to the 280 stuff, swapping out all the bushings they can and put the ZX discs back on. While we're at it we're doing the same thing to the front. After a week of installing, uninstalling, reinstalling and fabricating it is finally done. Saturday morning I took it to the local tire store to get the front end aliened, no surprises here, that's good. The car rides like a Cadillac, well a noisy Cadillac, with the new bushings and there is no more of that embarrassing NASCAR sound from the front brakes when I stop.
All this started out with minor disappointment because I had to farm it out. That quickly evolved into a major annoyance and then into aggravation but now has turned to anger. Not only has my car been down for over a week but this swap is getting very expensive. But in the end I think it was worth it. Those bushings had to be replaced and you can't have too much braking.
Thanks to all the techs at Balanced Performance for sticking with this and figuring out all the problems.
After a few months of physical theory for the rotator cuff injury I am about to start this transplant. While I was recovering I decided I needed a better place to work on this project than my present small garage. I just happen to have a friend who is a contractor so I had him build me a 24x24 foot garage in the back yard. It took a couple months to complete the wiring and interior but its finally finished. This is more like it, tons of dedicated car working room with no yard or woodworking equipment to fight around. I have been starting the Z28 every so often just to keep the oil circulated and now it was time to pull it into the garage. Its like it knew its guts were about to be removed so it refused to start! A few tests seemed to indicate an optispark issue, imagine that. Seems like a simple task to swap it out, yeah right. The GM engineers obviously never talked to the mechanics when they came up with this thing. You have to remove damn near everything from the front of the engine to get to the opti including the radiator, a ton of hoses and plumbing, all the accessories, air pump and even the water pump. Much of this stuff will not be going back on the engine when it goes into the 280Z, like the power steering and air pump.
Before I left for a scuba diving trip over the holiday I ordered a new optispark, it was sitting on my front porch when I got home. But it seems I should have done more diagnostics, the optispark was not the problem or at least not the only problem. As it turns out the coil/ignition module and the coil wire were the villains. I did not reinstall the old optispark to see if it too was bad, but with the new one and the coil/ignition module and coil from my 95 Z28 engine the engine started.
Now that the engine is running again I started preparing the Camaro for tear down. It all went very smooth with no surprises. After a couple days of removing the rest of the exhaust, some more wiring, the torque tube, driveshaft, steering column and draining the transmission the engine and transmission are ready to come out. Today was tear a Camaro apart day at my house. With the garage finally done enough to start working on the transplant the first order of business was to get the Z28 engine, transmission and fuel tank out of the car. Also planned was removing the front and rear suspensions for future sale. I invited a few friends to come over to help with the incentive of free food plus the fun of taking saws-alls to the remainder of the Camaro body. It all went well with no issues other than going through about ten saws-all blades, we were down to wood blades for the final cut! I spent the next day cleaning thirteen years of grease and grime off the engine the best I could.
January 30, 2007 the real transplant begins!
I put some of the Z28 parts I will not be using for sale on craigslist. While I was on line I looked at parts wanted and found someone looking for a reasonably priced SBC and transmission to go into a Datsun 280ZX. What are the odds? I called the guy and three days later he and a couple friends came over to pull the old engine and tranny out of my 280Z. This was a little tougher than the Z28 pull since we didn't use any saws-alls to cut body parts away! But still it only took a couple hours. This was a major coupe, I thought I would be stuck with that engine for a long time, nice to know it will be put to good use.
With the engine and transmission gone from the 280Z I could now start the transplant. The sale of the old running gear had moved up the process quite a bit so I got on-line and ordered much of what I needed to complete the engine/tranny swap. New setback plates and spacers for the motor mounts, drive shaft flange, radiator and mounting hardware and headers were ordered from JTR. While I was waiting for those to arrive I spent a few days removing the fuel tank, the entire body wiring, seats, carpet and dash from the car. The car is pretty much a shell at this point. I cut out the old transmission mounts in preparation for the 4L60E, cleaned up some old mounting hardware in the engine compartment and got it painted. I removed the old Datsun fuel filler neck that had Chris weld on the Z28 cap, just looks nicer.
The goodies from JTR are here, this stuff looks almost too good to put on a car, LOL. I read over the instruction manual again, trying to figure all this motor mount stuff out. JTR's website and manual call the part numbers for the passenger side and drivers side different, he should fix that. The manual (seventh edition) isn't clear at all on how to install these things and the only picture appears to use different mounts altogether. To say the least I was a little confused. A little sanity check on HybridZ proved I had them correct with the set back plates bolted to the engine using the non-threaded holes, then the spacers and the motor mounts are bolted to the set back plate using the threaded holes. Although there is no "correct" order for the pieces most use the method I decided on.
Big day today. I was up before the dawn, literally. Off to Home Depot to buy a 2x6 to sit the front tires on so the engine hoist will clear the suspension. Found that out when we pulled the old engine. At 8:00 my buddy Chris came over and we started the install. All went pretty well until the motor mount bolts would not line up with the cross member standoffs. I had slotted them and enlarged them to 1/2 but we were way off. I thought at that point I had them installed wrong, but no. We pulled the driver's side off, plate and all. We loosely bolted the whole assembly on the standoff and lowered the engine back down. It was a bit of a struggle getting the holes on the plates to line up with the block, tough to finesse a SBC, but we finally got them to go.
Then the tough part. I had cut the ears off the old tranny mounts but that wasn't enough to clear the 4L60E on the passenger's side. Driver's side was fine. We cut the whole tranny mount out about 3/4 of the way up and beat on the tunnel to clear the cooler lines. Fortunately my buddy volunteered to do all this without removing the engine, just lowered the back of tranny as far as we could. Another area of clearance issue was the passenger side tunnel front corner where the cooler lines and dip stick are located. My tranny has been rebuilt and it doesn't look like it has the stock lines. I decided rather than bend lines myself for the cooler to get Bowtie Overdrives Kit. The kit consists of hard line sections that route around the starter, along the engines pan rail and terminate just in front of the engines harmonic balancer. Then stainless steel braided flexible lines run from the cooler outlets down to these hard lines. The hard lines are cut to the correct length and connected to the braided flexible lines with Bowtie's slip-on fittings then tightened up using hand wrenches, pretty trick. I also decided I do not want to rely on the radiator for transmission cooling so I ordered a B&M SuperCooler from Summit Racing. Oh yeah, there is no way the stock dip stick would fit, I ordered a Lokar flexible one. I didn't hard mount the tranny yet, I want to beef up the floor a little rather than just running bolts though it to hold the mount. One thing I really noticed was how bad my frame rails a bent. I had seen it before but didn't realize how bad they are so I ordered some Baddogs frames. I'm getting there, still a lot of work ahead of me but this was a huge step. The garage looks cavernous now that the engine and tranny aren't sitting in the middle of everything.
The next day I removed much of the sound deadening and started beating the floor flat where the transmission mount will be attached. The plan is the run the four transmission mount bolts though the floor and into and flat bar welded to the floor for extra support. I also began to reconfigure the fuel tank area. This meant cutting out the old spare tire well and much of the floor. New frame members will be made to support the Z28 tank. It will be a tight fit but its doable. This was a very tiring but rewarding weekend. Its so cool to be in the building phase instead of just doing destruction. Somewhere out there is the light at the end of the tunnel!
Another weekend and I'm a little bit closer. I spent most of Saturday getting rid of undercoating to mount the baddog frames, what a mess. Thankfully its old undercoating and it mostly came off with a twisted steel brush on my angle grinder. I also had to beat some bumps on my old crunched rails back so the new rails will fit. It will still take some "force" to fit them over the old ones but I guess that's a good thing. Now to recruit a good welder, LOL.
Sunday I mounted the Z28 accessory mount with the gutted PS pump, the tensioner and the alternator and since the Bower AC mount came in Thursday I mounted it and the Z28 AC compressor. Bartman had said there was some tweaking necessary to use the Bower mount. I had to not only massage the shock tower and had the massage the Bower mount as well. And even with that I have less than 1/4" clearance, hope that's not going to become an issue later on. Then I finally got the transmission mount bolted up. At least temporarily, I had to beat down the floor some more to get it flat where the support flat bar will sit.
Since the engine and tranny are now in their final positions I thought I should at least test fit the Sanderson headers. The passenger side fits perfect, gonna have to move the knock sensor but I figured that. But I have a clearance problem on the drivers side. The front header pipe is so close to the motor mount spacer I can't even get a piece of thin cardboard between them. Looks like I will have to grind a little off the spacer. That fancy Sanderson logo on the header is very close to the steering shaft too. Monday evening I started grinding on the spacer. I took quite a bit off, more than I'd like but little by little the header got closer to fitting. Finally I could get a piece of paper between the spacer and header pipe. The just out of curiosity I switched the two headers side to side. Seems like Sanderson's quality control doesn't hold very tight tolerances. The other header fits with about a 1/16" more clearance. Looking at the weld at the port its obvious why. The second header is welded closer to the top of the flange opening than the first one raising the pipe at the bottom 1/16". I wish I had seen that before I started grinding. Hopefully the metal I removed from the spacer isn't going to be a problem, I don't think it will, there is still a lot left. Oh yeah, when the header is properly seated I have no clearance issue with the steering shaft.
I had to lower the transmission one more time to install the Bowtie cooler lines and the Lokar flex dip stick. Once again the tunnel needed massaging to make room for the cooler lines. When I raised the transmission back up the engine had moved once again, grrrrrrrrrrrrr. I spent several hours getting the engine back where I wanted, slotting the cross member has proved to be a PITA. But I eventually got it all lined up again. I bolted the tranny mount through the floor in the holes I had drilled previously and made some square washers to fit inside the engine cross member mounts so the engine can't possibly side in those damn slots. Hopefully this is all permanently mounted now. I still need to make my floor reinforcing plates but I can do that without moving the drive line.
It seems like I worked my butt of this weekend but really didn't get that much accomplished. I got the headers mounted and the plugs installed. But when I tried to connect my new Accel 8mm wires I ran into more optispark "what were they thinking" issues. The LT1 has a little plastic wire guide sitting on the accessory mount to keep the wires away from the belt and pulleys, mine is broken, dammit. I guess I'll have to go to the Chevy dealer for that, grrrrrrr. Plus because I now have the Bower AC mount on the other side the wires won't reach, grrrrr. Looks like custom wire time. And of course the knock sensor is going to have to be moved, not a big deal. I made a bracket to mount the computer inside the car and rearranged the wiring to clean up the engine bay on the passenger side. I mounted the radiator for the first time and figured how I'm going to connect the tranny cooler. I'm not real happy with the aluminum mounting ears on the JTR top radiator mount, it seem a little flimsy. I think I'll reinforce those to keep the radiator from moving around. I need to figure out how to mount the Z28 fans for the radiator. I made a mounting plate for the firewall to accept the Z28 accelerator cable but the stock cable is still about 1 1/2" too long, I will fix that tonight. One of the problems I'm having with this project is that much of this car was already adapted before I got it, so what others have done on their cars won't work on mine. The accelerator cable is one of those. Oh yeah, I sold $400 worth of Z28 parts Saturday, yahoo, more money for the 280Z!!!
I fixed the accelerator cable with one of those crimp on cable clamps, sure hope it holds, LOL. I got stranded once in the old setup when the clutch pedal linkage broke I don't want a repeat of that. Still fighting the spark plug issue. HybridZ people have given me many options and I'm fighting through those. I also ordered another set of wires to give me more long ones to pick from.
Friday: I got the knock sensor mounted on the drivers side using The Dial Zone's adapter. Yeah, I could have drilled and tapped the setback plate but I really didn't want to pull that thing out and for $17 delivered this was probably cheaper than buying a bit and a tap, took me 10 minutes to install. I had to add some wire to reach it but I would have had to do that anyway. I also had to lengthen the O2 sensor harness on the driver's side.
I made my tranny mount inside reinforcing pieces and got them installed ready to be welded in. I also finally made a decision on how to run the spark plug wires. Its a combination of many of the ideas I got from HybridZ. I ran them though the accessory mount on the passenger side and around the Bower AC mount on the driver's side. I still used the wire loom bracket that normally mounts on the valve cover. But the stock wires were too short so I made an adapter to drop the loom bracket down some. Hopefully this will keep the wires off the headers and I think it looks OK.
Saturday: I remounted the radiator and made some supporting brackets to reinforce the top mounting ears. I also made a mount for my B&M transmission cooler just using aluminum angle. On Ebay I scored some stainless Corvette FI braided hoses that quick connect to the LT1 fuel rails. My buddy Chris flared them for me to accept 3/8" brake line, stainless is tough to flare, thankfully he has a small press. I will run 3/8" input and return lines with a filter near the tank. I hope to get started on the tank install shortly, that's going to take some fabrication.
Sunday: I spent a lot of time running for tools and parts, LOL. My main goal today was to get the transmission oil cooler hooked up. This meant I had to get 5/16" line, a tubing cutter since I can't find mine, and a flaring tool, I should already have one of those anyway. I finally did get the lines run after one trip to Northern Tool and three trips to Advanced Auto Parts.
I did some searching on HybridZ for what to use for radiator hoses with an LT1 and JTR radiator and found this:
Top hose (driver's side): Gates hose # 21557,
Bottom hose (pass. side): top is Gates hose # 20065, bottom is Gates hose #21353
I looked at the water pump, counted connections and discovered my water pump has one too many fittings. Turns out Camaros and Firebirds have an extra fitting in case the LT1 is used in their performance models and requires an oil cooler??????????? On the Z28 radiator there is a fitting to hook this up, on the JTR there is not. What to do? Asked that on HybridZ and basically I need to remove the water pump fitting from the water pump and seal it off. The fitting is pressed in so you have to just work on it until it will pull out, why do I sense a disaster in the making! There are two methods to seal off the hole. Tap out the hole and use a screw in plug or use an expandable freeze plug. Both ideas are a little scary but I think I'm going the freeze plug way since it will be easier to do on the car and there is no way I'm pulling all that engine front end stuff off to remove the water pump. I managed to get the fitting out of the water pump without breaking anything. Now off to the parts store for the freeze plug, thanks for that tip Bartman. I know the Z28 fans could be made to work with the JTR radiator but they are just too wide and I just don't like the looks of them hanging off the sides of the radiator. I picked up a dual speed Taurus fan off EBay that will fit much better and will be at least as good if not better that the Z28 setup.
Its time for SEZ8, the drag race event in Perry Georgia held twice a year by HybridZ. But obviously I won't be taking my Z to this one and I just learned the September one has been canceled. I will still go to the event to hook up with the guys from the board and watch some awesome cars run. It was a blast last September and I need a little break from the car anyway, I've been going at this everyday for almost 2 months now.
At first I installed the heads steam tube hose to a tee fitting in the lower radiator hose like many on HybridZ have done. There is some controversy about where this hose should be. JTR says it should be in the upper radiator hose. GM has many different places it connect it including directly to the radiator and all GMs options use a vented fitting. That vented tee fitting on my donor Z28 is on the heater hose assembly. I cut off the GM hose clamps, not a big deal, to free it from the GM heater hose assembly. I used the bent end of the Z28 heater hose at the water pump, then attached that to the tee fitting. Then attached the 5/8" heater hose to the other end of the tee. I re-routed the steam tube hose around the water pump heater hose outlet and attached it to the tee. I had to cut off a little of that hose but it lined up very well. I'm not sure it really matters that much, but the 94 Z28 runs it this way. I'm staying as close to stock as I can, I think it looks cleaner this way too and helps run the heater hose around the accessory mount.
It still amazes me how long its taking me to accomplish what I perceive to be small projects. Today I took on the Taurus radiator fan mounting. I had a plan which involved making three aluminum bars to mount onto the JTR radiator mount braces. These would be drilled and tapped for the fan to be mounted to. I did get it built and installed but it took me 5 hours, of course I did make one of those pieces three times and made one run to the stainless bolt store, LOL. But at long last the cooling system in done. I painted everything behind the grille with black POR15 so the view through the grille will look more menacing.
I made some brackets for my new LED turn signal/running lights. These will be positioned behind the grille in roughly the same location as the ugly Datsun lights. Naturally I forgot about the overflow tank and now the LED lights interfere with its original position. I picked up an after market overflow tank which will sit in roughly the stock tank location.
With the engine pretty much done I moved on to the fuel system. I have chosen to use the Z28 tank and its internal pump. This will involve several fabrications. I cut the floor and the spare tire well out and discovered the tank will fit pretty well except the bottom of the tank sits 5 inches below the rear valance, too far in my opinion. Again I turned to HybridZ for advice and suggestions. Wheelman told me of his LS1 tank install. He installed his tank by flipping it around to get the correct orientation of the filler neck and to put the deep part of the tank toward the front of the car. I tried this, it fits much better and is totally hidden. The one downside is the risk of fuel starvation under acceleration. Wheelman told me he had just run an Auto-X event where he started the weekend with about 1/2 tank and ended running on fumes with no fuel issues what so ever, encouraging. The other issue is now the fuel lines come out of the tank facing the right rear of the car. But this may be a blessing in that it will allow me to route the lines through the rear suspension and make it easier to hook up the vent lines from the tank. There are several others on HybridZ that have install LS1 tanks this way with no issues. Seems like I'm the first to try the LT1 tank but there doesn't seem to be much difference other that the LS1 is plastic and the LT1 is steel. I will have to add new supports to replace the ones I cut out and add new holders for the tank straps. I will also have come up with a hose connection from the tank to the Z filler tube.
Most of your life you try to make decisions that will save you time, money and hassles. Building a hot rod is much the same. There has not been much progress on the build lately. Lots of work, just not much progress. Much of the problem is not being able to weld and not even having a welder. My list of welding jobs is getting large for sure.
I made the choice to use the Z28 LT1 fuel tank thinking it would save time and money over buying a new fuel pump and using the existing 280Z tank. Wrong! But once I cut out the trunk floor I was pretty much committed. After spending two weekends of buying an unbelievable amount of rather expensive steel, cutting wheels and grinding discs for mount fabrication, I now have the most expensive fuel tank ever made! But hey I built it and isn't that what this is all about? My buddy Chris welded it up but it still needs installed which will take more welding. Chris says he will come over in a couple weeks and weld up all my projects.
The wiring harness looks like it might be the same. While I still think my decision to gut the old Datsun harness and start over was a good one this has proved to be a lot tougher than I had anticipated. I have taken more wire out of the Z28 harness than I have left. I have already shortened and lengthened a bunch of wires and I have not even started on the chassis wiring. I should have known better, not only have I done this very thing before this is pretty much what I have done all my life for a living as a computer engineering technician. Wiring takes time, a lot of time. I had also wanted to use the Z28 steering column but that turned out to be way past my skill level. So I need to adapt the ignition switch, wiper switch and turn signals to the Z28 harness. I put all the connectors back on the Datsun column, there are 25 wires to figure out. I will not be using the light switch so that will eliminate a few.
It�s the small things on a hybrid conversion that seem to take the most time. This weekend I finally started installing the wiring Z28 harness into the car. I started with the Z28 relay/fuse block that mount in the engine compartment. The first problem was how to get the major connector through the firewall. GM accomplished this by having a large square hole in the firewall and using sort of a sandwich hard plastic grommet thing and a ton of gooey sticky stuff to hold the wires, I did not want to attempt this. I enlarged the hole on the driver's side firewall where the old harness ran. I fed the Z28 interior harness connector and several interior switches through from the engine side. I then wrapped the harness with 1" split loom and located it into the old Datsun hole. I then made a sheet metal panel the mated up with that hole and used 3M rope caulk to seal it all up from both sides. Next issue was how to mount the relay/fuse block. I had cut out the metal from the Z28 anticipating this. With some beating and bending I was able to reconfigure it to bolt under the inspection door on the driver's side. That sacrifices the windshield washer bottle but I'll figure out that later. Coming off this relay/fuse block are the wires for the fans, front lights, horn and all the +12v fusible links. The fusible link cable runs across the car to a terminal block where they mate up with the battery, starter and alternator. I made a bracket to mount the terminal block and run the bundle of wires across the firewall. Since I am ready to wire up the headlights this was the perfect time to swap out to the new halogen headlights. Not only will these give me more light they look cool.
It took almost all day but I got the wipers wired up. I decided to stick with the stock Datsun wipers and column mounted switch. I then made new cables for the battery, alternator and the Z28 +12v terminal block where the fusible links hook up. I decided to use the Z28 battery since it was new and the side mount terminal make it easier to hook up. I ran a +12v cable to the starter and one to the +12v terminal block. I then ran another one from the terminal block to the alternator. The negative battery cable runs to the passenger side rear head and I run two cables from the firewall to the engine and one from the engine to the frame. The stock battery tray is a little large for the Z28 battery so I added a plastic block to the tray to hold the battery from sliding. The hold stock Datsun hold down really doesn't work all that well but with some slight modification and a new threaded rod it will be fine now.
I moved my attention to the 4L60E shifter. I had cut out a big chunk of the Z28 transmission tunnel anticipating this. However as it turned out that idea did not work, it puts the shifter too high for the cable to attach. So its fabrication time again. I cut out a lot of tunnel to drop the shifter about 1.5" and made a plate to cover the hole. Then I made brackets to weld to the tunnel, shifter will be bolted to those. The welding list gets longer!
Its welding day! My buddy Chris came over today armed with his MIG welder and a ton of gas and wire. The plan was to weld in the fuel tank frame I made for the Z28 tank , weld in the transmission mount reinforcement plate floor plates and the dropped tunnel plate and brackets I made to lower the 4L60E shifter and weld on the Baddog frames. It was a very long day especially for Chris who obviously did most of the work. It all went pretty smoothly with only minor adjustments to the tank frame to allow the new floor boards to be installed. The Baddog frames took almost 6 hours to position and weld in, I had previously cleaned all the undercoating and stripped the interior. We used a couple hydraulic jacks and some 2x4s to get them as tight to the floor as we could. Chris then clamped them tight against the frame with "C" clamps and stitch welded them into place moving the clamps as he went down each frame. I will clean this all up and applied a coat of POR-15 for rust protection. With these accomplished I can move forward with some large projects like the fuel lines and wiring in hopes of actually starting the engine.
As usual things are moving slowly. I got the baddog rails seam sealed and painted with POR15 along with the rest of the new welded parts. The shifter is mounted and connected to the transmission. After further review I decided my extra radiator supports just weren't adequate so I redesigned them, the radiator is now rock solid. I had ordered a new fuel pump because the one I have has 115,000 miles on it, why take the chance. I ran the rest of the 3/8" hard fuel lines attached them to the car with rubber cable clamps and plumbed in the air vents for the fuel tank. I sent in a order for an Aeromotive 12308 EFI fuel filter to Summit. I then attempted to install the filler hose, no luck. The feed pipe on the tank is going to have to be angled some to make this fit. I am certainly having third thoughts about this tank swap but its way too late to give up now! I have once again started getting the interior wiring harness ready for installation. I have decided to go with a TransAM gauge cluster rather than the Z28 one, just looks cooler. But of course the connectors are different. I was lucky enough to find someone local who just gave me a Firebird pigtail so all I had to do was swap 30 wires. Fortunately the wiring harness is the same so all I had to do was match up colors with the help of the factory shop manual. My car was a stick shift and I am converting to an automatic so it would be nice to have the wider automatic brake pedal. I posted a parts wanted request on HybridZ and a guy from PA replied saying he was converting the other way and offered a straight swap. I sent him my clutch and brake pedals he sent his brake pedal, sweet. Personally I think I got the better of the deal, my pedal pads were pretty worn, his look almost new.
Well, this is Memorial Day weekend and its the end of month four. I was certainly hoping to be running by now but I'm not. The fuel tank filler issue is still plaguing me. I have come up with plan 300, LOL, and will be using a hard line filler tube. Hopefully Chris will have this welded up this week end and I can reinstall for good.. The cold air intake parts arrived this week so I decided to see if my plan works. For once it all worked. I didn't even have to cut the aluminum tubes, amazing. The system consists of a black powder coated aluminum elbow, two 90 degree 3" mandrel bent aluminum pipes, two 3" silicon hoses, a 3.5" to 3" silicone reducer and a #2530 K&N filter all of which I picked up on EBay. Certainly not the cheapest way to go but it looks really good. The elbow sits between the throttle body and the MassAir, then the 3.5" to 3" silicone reducer that connects to a 90 degree aluminum section. That connects to another 90 degree section which runs through the radiator support on the driver's side and hooks to the K&N filter. Its all held together with 3" silicone hoses. I also made a bracket that bolts to the end of the K&N filter for support and one to support the MassAir. Its getting very crowded in front of the radiator but sometimes its about the bling, LOL.
I played a little with the Z28 wiring harness getting most of it wrapped and ready to install and made a small bracket to mount the transmission park switch. Before I try installing the harness I need to make sure where the big connector, the fuse box and the alarm module are going to reside. I also need to get my AC unit and get it installed. On that note I installed the dash frame and began the process of mounting the TransAM gauge cluster. This is going to work much better than the Z28 cluster. I trimmed and trial fit about 5 times and made some reinforcing to stiffen what I cut out. This dash project is a major undertaking but I think it will be worth it for the individuality angle of my Z. It looks like I may be able to put the fuse box in the end of the dash, that would be cool. I designed a new center section that will take the place of the old Z center section but will retain the Z glove box.
Another step closer to finishing the fuel system. Man what a nightmare, what the hell was I thinking, LOL. I had to pull the tank again, I think that's about 6 times, to change out the filler neck so it would line up to the Datsun filler door. This took a 2" 90 degree bend of exhaust pipe and a few couplings but I ended up only using a short piece of rubber hose to connect the tank to the filler door. Once again my welding buddy Chris came through for me. I picked up an Aeromotive EFI canister type fuel filter from Summit, I got everything plumbed in and made a mounting bracket . In addition to the filter I installed an electronic fuel pressure gauge just after the filter. The trunk flooring will have to wait until I'm sure I don't have fuel issues. But the tank is in, hopefully to stay this time, I am so glad this part of the project is behind me.
One thing I am adding to the Z for creature comfort is AC. I live in the south, it gets very hot here in the summer and I really don't want to deal with the heat for another summer. So its off to Brewer's Restoration & Performance to talk Vintage air. I will be using the Z28 compressor but everything else will be new. Yeah its gonna be expensive but worth it not to suffer through another summer of heat and humidity. And maybe now I'll actually be able to run the headlights and the heater fan at the same time, LOL. So before I get too far into wiring and dash modification I need to get the evaporator and bulkhead fitting installed so I don't run into fitment issues later.
With the fuel tank build behind me I now need to address the dreaded wiring. The wiring in newer cars with all their anti-theft and safety circuitry can be frightening to say the least. I have cut out a ton of wiring from the Z28 harness but there are still some "mystery" wires. Being forced to use the 280Z switches for wipers, turn signal and the headlight dimmer has proved to be quite a task. Obviously whoever wrote the Datsun and Camaro manuals did not go to the same school, LOL! I decided not to use the 280Z ignition switch. Since I'm going with a push button start the key switch will also be dash mounted. Before I can start to install the wiring harness I had to figure out where things would mount. The fuse block is the biggest issue. It needs to be hard mounted and be easily accessible. Since the wiring enters the passenger compartment on the driver's side the logical place is in the end of the dash. This side of the dash will be heavily modified to accommodate the Trans AM gauge cluster so I had a clean slate to work with. I made a new end panel, extending the dash about 1 1/2 " to mount the fuse block. There will be a door to cover this later. I then made brackets to mount the gauge cluster, making sure I had access to the mounting screws so the cluster can be removed without too much trouble. Now the hard part. I need to make new frame members to attach the new dash outer skin and a surround for the gauge cluster. The outer skin will be covered with fiberglass and then painted, the surround will also be fiberglass but painted a different color. Doing this without the use of a welder on hand is difficult and slow but its taking shape.
Well I'm not finished with the wiring harness but its time to see if some of this swap will work. First test was some of the electrical system. Headlights, parking lights, fog lights work and tail lights work, turn signals and brakes lights do not. The turn signals and brake lights run through the hazard switch which I do not have yet, I may have to bypass that. I am running LEDs for everything but the headlights so I will probably have to swap out the flashers too. The fuel system was next. I had to make two trip to the gas station to get five gallons of 93 octane for the LT1, gotta get a bigger gas can, LOL. As soon as I turn on the key the fuel pump stated, a good sign. But there was something else making a humming noise. UH-OH, its the wipers, I must have wired something wrong there. I had disconnected the main fuel line to run a bit of gas through it before hooking it to the engine. With that accomplished I hooked it to the engine and turned on the ignition again, the pump ran until it established pressure and then turned off, a good sign. But under the car there were two small leaks and one gusher, dammit. A couple fitting were not tighten fully and one was ridiculously loose. With those tighten it all seems good. I also wired up my electronic Greedy fuel pressure gauge.
Even though I don't have water in the engine or transmission fluid installed I thought I'd see if the starter would kick..............NO. When I had the PCM reprogrammed I left the VATS enabled and picked up one of those EBay bypass modules thinking that would eliminate the need for the GM key resistor. Well, I should have taken more time to fully understand how the VATS works. There are 4 inputs to the VATS, +12v always, +12v ignition switched in run and start, ground and 2 inputs from the resistor on the ignition key. There are 3 outputs, the security light, fuel pump enable and start relay enable. If you don't have the correct key nothing works! I was under the belief that the car would still start but the VATS would shut off the fuel after a few seconds. But that EBay bypass module does NOT take the place of the key resistor, it outputs the fuel pump enable so the PCM thinks there is a working VATS. Since I still want to use the VATS I measured the resistor in the Camaro key at xxx ohms with a spread of xxx - xxx, made a xxx ohm resistor combination to substitute for the key and installed it using a quick disconnect so I can remove it when I want to fully protect the car from theft.
After 4 1/2 months I finally was able to attempt starting my LT1 swap. Oh sure, its still on jack stands, there is no driveshaft or exhaust, the heater hoses go nowhere, the complete Z28 wiring harness is lying on the car floor the whole interior including the dash is out of the car........ but it started on the second key turn!!!!! I'm sure my neighbors were thrilled to hear a 5.7 liter Z28 with open headers fire up at dinner time, I did warn one of them. The only issue I saw was my tranny cooler lines are leaking, but I expected that. I didn't do a very good job on flaring these and planned on redoing them anyway. At long last its all coming together. This was a major rush for me and just in time, I really was getting a little discouraged. Now I need to get that driveshaft measured and installed so I can see if this thing will drive and hopefully meet my expectations.
I fixed those leaky transmission lines with new ones, its obvious flaring is an art I haven't grasped yet, LOL. I crawled under the car and measured the driveshaft length. Its 24 1/16" from the differential to the end of the transmission tail, hopefully that will be enough for the shop to cut down the Z28 shaft, add the flange adapter and new universal. I moved my attention to the dash again. I know there are still wiring issues but I need to get the frame work of this dash finished and welded before I can install any wiring. Besides I just didn't feel like getting into wiring this weekend! I scored a metal brake from my neighbor who practically gave one to me, yahoo. It sure makes bending sheet metal easier. I made a large center section where all my instrumentation will reside from 16 gage steel metal. This is bent over and is bolted to the top of the dash, runs down the face and bolts under the bottom support on the dash. I was then able to remove the stock welded in horizontal support that used to support the Datsun gauges giving me a nice clean slate for my new instrumentation. I also made a couple of filler pieces on each side of that center section and another for the left end of the dash. When I get all the metal work done I will have Chris tack weld it all in place and then start laying fiberglass over it. In my head this is going to look awesome, I hope I can pull it off.
I have new stuff and I think the last of the "big" stuff I need for this project! At least the last of the stuff to make this a driving car. The driveshaft is done. I had it cut to 24 1/16" from the diff flange to the transmission seal. I provided them with a new 1310 "U" joint and the JTR flange adapter. The shop also changed the yoke for me because they said it looked like the original and was showing its age. Cool, they were looking out for me but then again maybe they just wanted the extra $25. Either way its good to have new parts. The total cost was $152, not bad. I installed that, oh what fun. Datsun certainly did not make this easy, there is just no room to work in that area. The JTR instructions said to use 8mmx30mm socket bolts, nylon lock nuts and to use red locktite. I picked all that up but soon discovered the 30mm bolt are not long enough to engage the nylon on the lock nuts, back to the bolt store to pick up 40mm bolts. With the driveshaft installed the time has almost arrived to see if I have the guts to attempt to drive this thing. I did start the car and tested the transmission, seems to work in all gears, but I realized I need to bleed my brakes, kind of forgot about that!
My Vintage Air AC components also came in this week. I got the condenser mounted in front of the radiator. I doubled up on the provided brackets for the top mount for a little extra strength and fabricated bottom brackets. I then mounted the dryer low behind the radiator frame on the driver's side. I got the four position bulkhead fitting mounted pretty much where the stock Datsun heater hoses went through the firewall. This all will take some time but I need to get some of this done before I can continue with the dash and wiring. AC work is totally new to me, so I will probably need some consulting on this. The thoughts of having AC in the Z is motivation enough, it�s the beginning of summer here in the South and its getting hot. I figured out where I want to locate the evaporator but I need to get some sound deadener on the firewall and get some of the wiring in position first.
The start of month six and I still haven't hit the road. But progress continues, although slowly. This weekend I managed to get the wiring harness shorten in some places and lengthened in others, its taking shape. I also got the dimmer switch to work, not an easy task. Seems Datsun and GM have totally different approaches on that one. I had to modify the Datsun dimmer switch to get it to work like GM's. But I still have no wipers, turn signals or brake lights. And the fans need to be rewired. I got some sound deadener/heat shield installed on the firewall and tunnel in preparation of the Vintage Aid evaporator. I really didn't like the brackets that came with the unit so I fabricated new ones. I probably over-engineered these but its pretty solid. With a little clean up and painting that part will be done. Plumbing it and running the air tubes will be a chore for sure. There just isn't a whole lot of room in a 280Z!
Chris the welder finished welding the 300 pieces that will make up my new dash. I test fitted it to see what moved, of course stuff moved! Not much though, the dash bolted in with no problem. But the gauge cluster was off a bit. I guess my "X" brace didn't really work all that well. But a little filing on the cluster bosses fixed it. In hindsight that smart thing would have been not to drill and tap the mounting brackets until it was all welded, live and learn. Now I have to start glassing over it all to make it look like something other than a pile of welded pieces. The big challenges will be the cluster hump and the Mustang center section to blend them into the rest of the dash.
This Saturday was suspension lowering day on my LT1 280Z. My choice was TOKICO HZ3012 185 lb/in and HZ3013 200 lb/in springs and shocks, bump stops 88-715 from Black Dragon and spacers 23-4186 from zcarparts.com. After the recent threads about Tokico kits dropping the car to the ground I was more than a little worried about this swap. But it all worked out perfectly.
Thankfully Nullbound form HybridZ volunteered to help me install all this stuff. At 9:00 AM Ryan came over and we started tearing the front struts off. It all went every well with a small detour with a stubborn brake caliper on the first side. The second side went very smoothly. After a break for lunch we moved to the rear. It's much different back there with the sway bar being unbolted and the brakes out of the way whole thing, arms and all come out. Everything was going perfectly and it looked like we were an hour away from finishing when I heard Ryan say "uh oh". One on the bolts holding the rear differential mounting member was stripped. It looked like a previous injury and not something we did. After a trip to the bolt store to get a slightly larger 7/16" bolt and a tap we were ready to install again. At least we thought so. Seems I tapped the wrong hole, DOH! Ryan went back to the bolt store for a second bolt while I tapped the correct hole. After that it all went back together with the only issue being the top washer for the sway bar, that last piece to go on, mysteriously disappeared. It took us 10 minutes to find the damn thing sitting on the trailing arm where we both had looked at least twice, damn garage gremlins!
It took 9 hours to do the whole car with including the two unforeseen problems. The car looks so much better sitting lower. The bottom of the rockers are sitting at 7.5" at the front with a nice little rack of 8.5" at the back. Unfortunately I didn't take measurements before the swap. I can't wait for my first test ride.
I can't thank Ryan enough for this, he did most of the work and without him I would have been lost very quickly. The shop manual tells you what to do but there are a lot of little tricks involved in this, not to mention some of this stuff is heavy and cumbersome to attempt doing alone!
There are three main things I need done before I can test drive the conversion. The dash, tail lights and exhaust, in that order.
On Saturday I started fiberglassing, did I mention how much I hate fiberglassing! I also did some more work on one of the tail light panels and started to build the second one. Then I got back on the wiring. I got the radio power run and tested the stereo. I ran a 12v hot wire for the console, I would like to have a power port in the console for cell phone charging and stuff like that. I got most of the wiring for the door switches, courtesy lights and a Z28 dome light wiring done, but I ran out of wire. The garage smells like fiberglass resin, I'll probably die of something weird before this is all done!
Progress has pretty much come to a stand still. Building this dash and tail light panels is taking way longer than I thought, maybe because I have very limited fiberglass experience. And the AC from Vintage Air which I thought would be pretty much plug and play is kicking my butt. Nothing seems to fit, everything I had previously mounted just seems to be off by inches. The condenser will not allow me to hook up the lines with the adaptors I bought, not sure how I'm going to fix that. And the hose fitting from the bulkhead fitting to the evaporator are just impossible to line up. I have no clue how I'm going to fix, there just isn't enough room to route all these hoses. I may have to get some custom tubing made for the AC lines. Right now I am very frustrated, especially about the AC.
Not to sound like a broken record but its the start of month eight and fiberglassing continues, man this is a slow process. But at least I see light at the end of the tunnel for the dash. I have a little more construction to do and then it�s the gel coat and the final finish. I plan on texture painting the top and will paint the center section a cool black Rust-Oleum metallic paint. I made a test panel with the paint and it really came out nice. The tail lights however I am not happy with at all. I may rethink the design and not bother trying to get so fancy, at least for the time being. I really would like to get this thing back on the road before the nice weather is gone. I certainly did not think the car would still be in the garage after seven months.
The check list seems to have stopped getting smaller. I have major issues with the AC mainly due to the fact that I don't know what I'm doing and that most of what I mounted is going to have to be changed. I need to bleed my brakes and get exhaust fabricated with the O2 sensors. My fuel level sender is not working, I have no floor over the fuel tank area and no carpet. As much as I hate to say it my enthusiasm for this project has taken a hit. I think maybe I bit off and little too much at one time to chew. If I hadn't chosen to do the dash and tail lights I believe I would be driving by now. What I need is a major accomplishment, something to rekindle that feeling I got when the engine started. I may have to bleed the brakes and take this puppy out on the street and pray a cop doesn't spot me, LOL.
I am in the final stages of the main dash build. Its down to fine tuning, fitment and sanding my butt off to get the center section as smooth as possible since this section will most likely be painted. My choice for paint is a Rustolium metallic black which has a slight metal flake look to it. I plan on clear coating it for added protection. Of course I still need to paint the top with the textured paint. I made the bezel for around the gauge cluster, it came out pretty nice if I do say so myself. I painted it with the metallic black paint and clear coat. I added a "Z" from the old Z28 side emblem to add a personal touch.
Well I couldn't stand it any longer. I've been doing nothing but dash building for weeks and needed inspiration. So this afternoon one of my buddies came over and we bled the brakes. I tested the brakes by pulling forward and back but then decided I was taking it on a short ride. Damn this thing is noisy with just the block huggers and the fumes..... The first pull it didn't seem to want to shift. I stopped and took off again and it shifted fine. It seemed to be a bit lacking on power at partial throttle but when it reached higher RPMs (no clue what since I didn't have the gauges hooked up) it took off like a rocket, YAHOO!! I do not have O2 sensors installed yet so hopefully that is the reason for the somewhat erratic performance at low RPMs. The whole thing was over in less that 5 minutes and I pulled it back in the garage before the neighbors called the cops, LOL. One thing that is bothering me is a clanging or clicking sound coming from the right rear but only when I back up. But I'm fired up again.
Its been a while since I updated this site. As I enter month ten I am a little closer. I have the Vintage Air unit installed with the AC lines and heater hoses run to the bulkhead. I still need to finished the under hood AC stuff, but that can wait. I have declared victory on the dash! Its all painted and ready for installation. The metallic center section came out nice and the textured paint looks pretty good. I was a little disappointed that the texture paint wasn't as thick as I'd hoped. I guess I was thinking it would be more like bed liner. The transition and contrast of the textured paint to the black metallic isn't as pronounced as I thought it would be. After the textured paint dried I hit it with three coats of trim black and three coats of clear coat. There are a few flaws but overall I'm pleased. Dash build write-up.
During tear down and in preparation to swap out the fuel tank I removed the 280Z sixty five pound bumper. In Georgia you have to run a bumper so I decided to use one that matches the fiberglass front bumper. Hey, the law doesn't say the bumper has to be affective, you just have to have one! After my experience with Show Cars, where I got the front bumper, I looked elsewhere for the rear bumper. I ended up getting one from Motorsports Auto. I also bought some 240Z to 280Z rear bumper mounting brackets from Datsun Spirit. Technically, the brackets are for European 260Z/Japanese A-S30/S31 models. These brackets bolt to the mounting holes in the valance just like a 240Z bumper would. Unfortunately they don't exactly line up with the MSA bumper mounting brackets. I had to make new brackets for the MSA rear bumper. I used a Dremel to cut off the MSA brackets, found some steel at Home Depot in the decking bracket section the same thickness as the MSA ones, bent them in a Z shape at both ends and then glassed them in. The brackets are short enough so the bumper sits only about 1/2" from the rear valance panel. The 240Z mounting tabs on the bumper are too far forward to use unless you drill through the fender on the 280Z. Since the 280Z fender is a double wall fender/inner fender I decided to use the stock 280Z fender mounting nut which is about 8" toward the rear from the 240Z tab. The 280Z mounting nut does sit below the bumper a little but not much. I made new the fender mount side tabs and glassed them in after cutting out the 240Z tabs. I put a piece of 1/8" rubber under the tabs to protect the body. Even though the Datsun Spirit brackets didn't fit perfectly I'm glad I didn't attempt to make them. It could be done but would have been a major effort with the equipment I have.
Since my first attempt at the tail light panels was such a disappointment I started on plan two. This time its going to be a one piece panel. I started out with a 60x12 sheet of 1/8" fiberglass from McMaster-Carr and started building. One other issue I fortunately discovered before it was to late was the hatch mounting bolts. To service them you need access behind the tail light panel, I will have to figure a cosmetic way to address that. I made a template out of cardboard for the panel; you know measure 15 times and cut once! The panel will bolt to the body using brass inserts in the fiberglass. The lights will be recessed 1� and will be 2� apart with the license plate between the two sets of lights. I did have to modify the stock rear panel to remove the bump-out and the cap-screw tabs where the old license plate bracket sat so the new panel would sit flat against the body. To make the recesses I made 4 fiberglass rings 5 5/8� in diameter, �� thick and 1� high and glassed them at each light cutout on the back of the panel. The lights will sit on the back of these and be held in place with straps. To solidly mount the panel I added some strips of 1/8� fiberglass along the edges and installed the brass inserts. This will allow me to bolt the panel in from inside the car with no exposed mounting hardware. I had to do a little body work on the Z to fix some spots that would not normally be exposed, like where the fender meets the rear panel. There was also a spot I accidentally hit with the angle grinder when I was cutting out the light holes, DOH. I painted the rear body panel and the light panel a semi gloss black before I mounted the light panel. After mounting the light panel I used some seam sealer to blend the panel to the body and painted it all again. I also added a lot of sealer on the inside in an attempt to prevent that infamous exhaust fume smell our Z are noted for.
In the middle of all this I scored a MSA rear spoiler on EBay. I had been wanting one of these for a while but couldn't justify the cost. I picked this on up for half price. Its brand new and required only a small amount of finish sanding. I did add some more fiberglass to the bottom where the mounting screws attach, I just don't trust that thin glass most of these after market parts are made of. The spoiler came with sheet metal screws but no template. It was a bit scary trying to line up the spoiler and drill holes through the hatch but I managed to get it right. I decided to use hanger bolts rather than blindly screwing the sheet metal screws up through the hatch into the spoiler. These will screw into the spoiler and allow me to add some sealer to them before dropping it on the hatch. I will then be able to use nuts to secure it to the hatch.
Another huge step in the quest for streetability was accomplished this weekend. I finished the Corvette tail light panel and got it installed Tail light build write-up. I know one thing for sure, I have a long way to go before I can call myself a body man. The construction part is pretty nice but I have some learning to do for finish work. There are imperfections in the recesses I thought I had fixed until it was painted. But it will do for now.
And at long last the hood went back on today!!!!!!!!
The list of necessary tasks to make it streetable is getting short. I needed to address the "clunking sound" I discovered on my test run coming from the rear end when I back up. With the car up on jack stands I checked all the nuts and bolts to be sure nothing was loose, nothing was wrong. Something was hitting something and it was related to driveshaft rotation. Then I saw it. The u-joint was only about 1/16" from the rear sway bar, that can't be good. The new u-joint is much bigger than the one that was in the car with the old setup. I did have some trouble getting the new one over the sway bar during driveshaft installation but just did not notice how close it ended up. Sometimes my attention to detail can be lacking! I unbolted the sway bar, pulled it out of its frame mount, tie-wrapped it to the mount so it wouldn't drop and ran the car forward and backward several times. Of course I am totally deaf now from the open headers but there is no clunking! Yahoo. Now the question is how do I fix this. The obvious but most expensive one is to get a rear mounted sway bar. Or I could just take the thing off and see how it handles without one at all. Several people on HybridZ have said a V8 Z would actually handle better and be more predictable without the rear sway bar. Trying to lower the frame mount for the stock front mount bar looks tough since the mounting bracket is welded on and at this stage I don't want to attempt welding in that area. I have ordered a new differential isolator anyway just because its a good idea. I have no idea how old the one on the car is, could be original.
This weekend's job one was the brakes....again. I seem to have a leak on the T-fitting right off the master cylinder, the side feeding the rear brakes. I was able to get some channel lock pliers on the fitting and tightened quite a bit. Hopefully that will fix the leak. I broke down and bought a vacuum pump bleeder, why didn't I have one of these already! The brakes seem to be fixed, time will tell.
I painted the rear spoiler just to solidify the fact I am not a body man. I know painting anything with a rattle can is just not done but you use what you have. On top of it I decided to attempt the silver body color. It tiger stripped, what a surprise, LOL. I wet sanded the hell out of it and most of it came out. But there were also a few flaws and a lot of sanding marks I could have sworn I fixed. I need new eyes! Three coats of clear and I declare victory for now. I suppose I should wet sand the clear, we'll see. Someday I will have this painted by a professional, but that will have to wait until I finish any other body modes I decide to do.
The steering column cover needed to be modified to fit with my new dash. This took hours, cut a little trail fit, cut a little, trial fit. While I was in there I replaced the turn signal/dimmer unit with a new one I picked up from Black Dragon. Although I took the old one apart, cleaned and lubed everything it would not stay in right turn mode. I also had to make a small wiring change to accommodate the Camaro dimmer and to get ground to my wipers.
I've started to reinstall the interior panels, if I can find them in this messy garage and remember where they go! I made a new panel for under the dash on the passenger side to hide the mass of hoses coming out of the AC unit and one for the right side kick panel that was never there. My attempt at the Vintage AC unit is not a professional job for sure. I think this is one I should have farmed out if I knew where to go. But I'm sure it would have cost a fortune anyway. Hopefully it will work even if the install is ugly.
Next I finally addressed the fuel level issue. When I brought the Camaro home the fuel gauge did not seem to work, Lord only knows how the previous owner dealt with this. It isn't the gauge because I have changed it and it still doesn't indicate the 5 gallons of gas I have in the tank, its reading 3/4 full. But to be sure there is a test for this. You disconnect the fuel level sender wiring, turn on the ignition, the gauge should move to full. Then you ground the purple wire which is the fuel level sender connection and the gauge should move to empty. That all worked perfectly. So it looks like the sending unit is bad or the float is stuck. Either way I had to pull the pump, DAMN. Naturally the sending unit is the most expensive sending unit in the world. Apparently you can't just buy the rheostat, oh no, you have to buy the whole assembly and close to $200!!!!!! OMG. I was able to score a used one from a poster on http://www.camaroz28.com/. I will either have to transfer the new rheostat to my setup or move my new pump and vent adaptation to this one. That's all assuming this fixes my problem.
While I waited for the fuel pump assembly I turned back to body stuff. I finally got the rear spoiler mounted, seam sealed around the tail light panel and filled in a few holes in the rear interior left from the fuel tank installation and the bumper removal. I installed part of the rear flooring and will finish the rest when the fuel lever issue is completed. I also took the rattle can to the rear valance, I still suck at body work. I painted the new rear bumper using the same SEM paint I use on the tail light panel. Of course that means I will have to repaint the front bumper too, but it needs a new coat anyway. I will clear coat both of them along with the rear valance for some added protection, I did not do that when I painted the front bumper the first time. I picked up some little LED lights to put on the kick panels which will light up the foot area when the doors open, just a little extra light for an otherwise dark interior.
With the holiday season approaching I found myself with a lot of vacation time left. The 19th was my last day of work for 2007. This gives me a lot of time to work on the car and finally finish a few things.
I got both bumpers painted and cleared, and mounted the rear one. I finally got around to the hatch area floor. I decided to make an access door in the floor so I can get to the pump in case I ever have too. I sure don't want to have to drop that tank again. I also finished the rest of the sound deadener and started carpet installation. Because of the new floor in the hatch area I needed to trim off a little of the taillight cover and add a support on each side. I was amazed the Corvette tail lights easily fit under the cover. I also run the wires for my backup lights through the floor and sealed it. I'm still up in the air about the backup lights but I'm leaning again toward the '65 Mustang lights. I may have to paint the housing black, I really don't like the chrome. The other choice is VW bug lights, but they look like a nightmare to mount. The real problem is the curved shape of the 280Z rear valance, but I think either light would work.
Since I was working on the hatch I noticed the seal has started to split in some areas. I picked up a new one to replace it. This is not the easiest thing to do with the hatch in place but I managed to get all the old sealer off. I painted the area with POR-15, just for a little added protection before installing the new one.
I had picked up new front carpet months ago so with the rest of the sound deadener in place I installed the carpet. I hate this job, the last time I did it the carpet had to be glued in place, what a mess. This time I got molded carpet thinking it would be easier...NOT. This is a one piece carpet and even though its molded to the car there are no pre-cut holes for things like the shifter, e-brake, seat belts or even the seat mounts. My plans includes a full length custom console so I ripped the carpet down the center to make it easier to maneuver. After three hours I managed to get the driver's side installed, looks pretty nice actually. A few minor adjustments were needed because my interior is not stock. The passenger side was a little tougher dealing with the e-brake and the modification I did in the firewall but I managed to get it all installed.
My cold air system has the K&N filter sitting right behind the grill. I made a rain shield that wraps around the front of the filter to protect it from direct rain. I'm not sure that is necessary but this will be a daily driver and will see long trips so I'm not taking any chances, hydro-lock is not a pretty sight!!
My plan was to get to the exhaust guy before I did a lot of this but it seems he too has vacation planned and close the shop for two weeks, figures. I will have to get that done after the first of the year.
The project was put on hold for a week as I am headed to the Cayman Islands for a week of scuba diving...the other expensive hobby, LOL.
I made it back for the dive trip without any problems, well I did get bitten by a stingray but no damage was done! I made an appointment to get the exhaust installed next week. I picked up new oxygen sensors since I have no idea how old the ones that were on the donor car were, no point in taking a chance on those being bad. Man I can't believe this project is so close to being drivable. The exhaust guy's shop is only about a mile from my house so I decided to drive the car over, that should wake the neighborhood up, LOL!
My Z went to Fenski Automotive Center , the exhaust dude this morning. The longest ride to date, LOL about 1.5 miles. I'm sure the neighbors loved hearing it fire up and drive down the street with open headers. I was also finally able to test my sound deadener. I fired the car up in the garage, it is of course very loud with the open headers. It has gotten a little cold in Atlanta this week so as I pulled out of the garage I rolled the window up and was really surprised how quiet it got. I had installed two layers of sound deadener I picked up pff EBay on the firewall and all the floor areas under the new molded carpet which has a built in padding. I was able to listen to the stereo without cranking it to max. I told the exhaust dude to give me a little quieter system than the turbo muffler system I had on it before. He suggested Magnaflow but as it looks there just isn't room for those. In addition my LT1 fuel tank fabrication I am so proud of is going to make it difficult to route the pipes to the rear. I just didn't think about that when I fabricated the tank mounting. So the car remained at the shop overnight and this all has left me feeling a little depressed, ah the joys of hot rodding! After three days in exhaust prison what I finally ended up with was duel 2 1/4" pipes running though short 4" mufflers right behind the transmission pan with some additional resonators at the rear ending in some pretty cool flared exhaust tips on each side. The system does a great job of quieting it down while still having a nice growl, I am very happy. The tecnician was concerned about the location of my fuel filter which is above the passenger side exhaust. I told them I was going to add a heat shield under that anyway. Based on what I paid two years ago for the custom system I knew this is going to be expensive but ya gotta have exhaust! Actually the parts weren't that bad but the six hours of labor cost me a bunch. I gotta learn how to weld, LOL.
If you've been reading this page you'll remember in paragraph two I said "wonder what I'll do next year". Well that year has almost passed, maybe I jinxed myself. I did divert somewhat from my original plan and added a few "while you're at it" projects and much of what I planned all along took much longer than I predicted. But at least the car is somewhat drivable. I only have a few projects left to complete. After I get the heat shield made I will get the front end aligned and address that gauge issue. I still have to finish plumbing and wiring the AC, back-up lights need mounted and the grille and front bumper need mounted. Oh yeah there's that new console to build, another fiberglass project and probably another month or so, LOL.
My plan for the weekend was front end alignment and some test cruising. But of course Murphy had other ideas.
I discovered a fuel leak at my fuel filter Friday evening. I had people coming over so I couldn't fix it until morning. After I fixed the leak I decided to take a run around the neighborhood, sort of a shake down ride since I really haven't been able to drive it yet and I missed my early morning opportunity at the alignment dude. I was watching the gauges pretty close since on my ride home from the exhaust guy last week the temp gauge was really high and suddenly the check gauge light came on, so obviously something is not right. I went home and let it cool down for a while before checking the radiator, it was low, about a gallon! Wow, I thought I had filled it completely. I filled it up and started the car and again it climbed over 210. I remembered people here talking about LT1s needing to be burped to get rid of air pockets. I have 2 bleeders, one on the thermostat housing and the one I added to the steam pipe/heater hose connection. I slowly open the one on the steam pipe and sure enough it stated spraying steam and a little water. I closed it and checked the temp gauge, it was down below 180, but stated climbing again. I burped it a total of three time and now the temp sits right at 180 at idle or running. Obviously I should have done this sooner but running the car without an exhaust is not something my neighbors would appreciate. I will attempt the front end alignment next week.
When I bought my front fiberglass I also got a front spoiler from Show Cars. Again I don't know what these people are doing but this spoiler does not fit a 280Z. I added some glass to the sections that wrap around the sides and notched the top so it fits on the bottom of the grill opening. Not the traditional method but I think it looks good and still leaves me six inches of ground clearance. I glassed in four mounting tabs which bolt through the valance and drill four holes in the top to secure it in the grille opening, don't want this thing moving around in the wind at high speeds.
I drove the car to work this morning thinking the cooling problem had been solved. On the way home suddenly the car seemed to lose power, started to overheat and I could smell something hot, but it wasn't coolant. I pulled to car over the see what was wrong. When I let off the accelerator the car almost stood on its nose, like the brakes were locked. I got out to see the front caliper on the driver's side was smoking, that can't be good! I didn't look at the other side or the rears. The brake pedal seemed to have very little play in it. I let the car cool down for awhile, the brake pedal seemed to be back to normal so I continued on, it all seemed to work fine for a while but I soon had the stop for a light. When I took off again the problem was back, lack of power and the car seemed to be struggling to shift out of second gear (4L60E automatic). I jerked the wheel back and forth a few times and that seemed to unlock the brakes long enough to get me home. I jacked the front up and spun the front wheels and it all seems fine. It was all too hot to deal with so I get to it tomorrow. Looks like I have some more debug work to do. I hope its not a caliper issue. The brakes have been on the car for almost two years without a problem, but the calipers were off during the strut replacement and the master cylinder and brake pedal were out of the car during the LT1 swap. I adjusted the brake pedal back a bit and took it out for a test ride. The problem did not reappear, but I'm not convinced yet. However the cooling issue is back. I burped the engine again but the temperature still fluctuates a lot. I have done a lot of reading about this, looks like I need to open the valves for a longer period of time to get all the air out. There is also a question if I have the correct 160 degree thermostat, there is a short one for older 350s and a long one for LT1 engines. Hopefully I still have the box with a part number I can check so I don't have to pull the thermostat to be sure.
One more attempt at burping this cooling system. Following the instructions on ShoeBox.com I opened up the bleeders and the radiator cap and started the engine. I let the engine warm up until the thermostat opened. Then I put on the radiator cap and ran it for about fifteen minutes and closed the bleeders. The temp had gone up past 200 kicking on both low and then the high speed on the fan, but soon dropped to 180 when it was all close up. I drove around for a while and the temp stayed at 180, hopefully I have fixed this. As I was wiping up the spilled antifreeze I discovered a small leak in my transmission cooler return line. A tightening of the hose fitting to the hard line fixed that. I guess the smart thing to do is to check every nut and bolt I have on this car before I declare victory!
I played around a bit with my gauge cluster trying to find out why the oil pressure gauge is pegged all the time and the fuel gauge never goes below 3/4 full. All the test I did say everything should work but it doesn't. And now after a test run of about 1/2 hours the speedometer isn't working either. I have ordered a new gauge cluster! I will say this car accelerates and handles so much better than it did before I made the LT1 swap and added the new lowered suspension.
I spent most of Sunday making the frame for my console. I used the same theory to make the frame. I used �� aluminum angle to make the basic frame and covered that with 1/16� fiberglass sheets. I made two cup holds, how did people exist in the �70s without cup holders, and a recessed area to put things you don�t want sliding all over the place and a compartment with a lid. The shifter area is raised slightly to clear the stock Z28 shifter mechanism. I then covered the sides with black vinyl and the top with oak veneer. I also made a fiberglass panel that sits on top of the console and below the dash center that will be the heater and AC controls.
Before the Super Bowl I decided to take the Z out for a longer run. I drove around for about an hour. I watched and listened for any signs of a problem, it all seemed fine. I ended up on one of my favorite curvy roads and pushed the car a little. It handles like a go-cart. Man its been a long time since I drove a car that seemed to be able to take curves faster than I was brave enough to do. I am so out of practice. One major issue cropped up on my first tight left hand turn however. I had just filled the fuel tank and there is a fuel leak somewhere on a hard left. Its either coming out the gas cap or the filler neck hose isn't tight. The smell of gas inside was pretty strong and when I stopped you could see the fuel was running down the inside of the fender and had dissolved some of the undercoating I had sprayed in there. I will have to pull the inside trim to investigate that.
I have been researching strut brace bars for a while. There are many to choose from, some bolt in, some require drilling and some even welding. In the end I decided on a simple bolt-in ones. I contacted Techno Toys Tuning for both their front and rear strut bars. Gabriel told me he could make the rear bar from 1" stock rather than 7/8" that would allow me to mount my video camera using a mount I made�just for grins. The larger size bar didn't cost anymore and the mount only cost me about $10 to make. The bars are solid aluminum and connect to mounting brackets powdered coated a dark blue using heim joints on each end for adjustment.
Well the new gauge cluster came it but it did not fix the oil pressure problem. Seems the EBay purchased oil pressure sending unit is no good. Unfortunately I bought this well over a year ago so returning it is impossible, live and learn. But the new gauge cluster has on 47000 miles on it so I will still use it. I swapped out the white face overlays and installed the new cluster. But it does not look like the fuel gauge is working yet. At this point I'm wondering if the float is sitting properly from how it was in the Z28. The tank is level but maybe that�s not how its supposed to be, I am so confused.
Although I may have to pull it all out to finish the plumbing on the AC condenser I installed the grille and front bumper. I decided not to reuse the aluminum brackets I used before and optioned for some new steel ones using some scrap cash drawer rail channel I got from work. This method will allow me to easily remove the bumper without having to unbolt the brackets from the body.
I have one more hose in the A/C plumbing nightmare mounted, only the two to go. The last two are going to involve the service ports and one of them has to make a 180 degree bend from the compressor to the condenser, so I will need to have that one made as a hard line.
I decided I did not like the look of the front spoiler being painted black. With the bumper and grille also painted black it was just too much black on the front end. I took it off, scuffed it and painted it silver to match the body color. I think it looks better and makes the front of the car appear lower. While I was in there I pulled the bumper brackets I made off to have them welded, these will be painted with POR-15 before reinstalling.
When I wired the Corvette tail lights the brake lights only worked with the inside set of lights and the turn signals with the outside lights. I didn't like that. I picked up a trailer connection, Hoppy 48845, that allows me to combine the brake lights and turn signals. I now have all four lights come on with the brakes and only the outside ones blink with the turn signals. I also picked up an LED light bar with 40 LEDs to use as a third brake light. I mounted this inside the hatch glass where it can not be seen until its activated. In a small car you can't have too many brake lights!
In an exchange of car parts I ended up with a set of Corvette fuel rail covers. It took some modification and trimming but I got them to fit on my engine. Ideally since I really don't have a Corvette engine, it�s a Z28, I would like to fill in the Corvette embossing and paint them. In the mean time I removed the beat up Corvette logo, painted the recess red and added one of those Corvette stickers I scored on EBay and left the Corvette embossing which is painted red. I also install an airfoil to the throttle body and trimmed it out with an aluminum LT1 top plate. All this dresses up the engine a lot and make the install look much more prefessional.
This coming weekend is the annual Z drag race event in south Georgia, DNI. The big difference for me this year is I now have a car I can actually run! I'm still a little nervous about making some passes. Its been a lot of years since I raced. I haven't really attempted a hard launch or ran it to red line in more than one gear. The plan as always is to drive down on Saturday morning where many of the participants will meet at a local motel to show off our cars and swap some car stories. Its always been a great time. This year's event looks like it will be larger than usual. The format has change from only a test and tune with the addition of some class racing with prizes. I don't think I will be entering the competition part though. I will be shooting video again and have even installed a in-car camera mount to record my runs. Hopefully I won't do anything stupid and get it on tape, LOL.
DNI was fun as always and I did make some runs, 5 in total. I shot video of my first run with the in-car camera and got someone to shoot my last two runs. This was my first drag race in over 20 years, I was very nervous, note the horrible reaction time! I was very pleased with a 13.180 @ 104.25. The next run I totally screwed up, I actually had the E-brake partially on, stupid. I followed that with my best run of the day 12.921 @ 106.48. I had two more runs which are the last two on the video, 12.96 @ 106.90 and 12.97 @ 107.735. I am very happy with the way the car ran, better than what I had hoped for. Other than the starter issues I had that started before DNI I had no problems. One thing of note is gearing. If I was really going to seriously race this a deeper gear would be nice. I crossed the traps at 5000 RPM in 3rd gear. I had the opportunity to weigh the car at the track. With a full tank of gas it came in at 2905 lbs. Using some on-line calculators that equates mathematically to 310 HP at the flywheel and 265 HP at the rear wheels.
Like I said I had starter issues before I went to DNI. It seemed like after that car got hot the starter would not turn. The solenoid would engage but the starter would not turn. It looked like the battery was the culprit but a new battery proved that was not the case. It was very temperamental at DNI but always managed to start after a few tries, not the best of situations for a street car! After I got home I pulled the starter and had it checked at O'Reilly's, it failed the test. Rather than just replacing it with a stock starter I ordered a gear reduction one along with a heat shield. My exhaust runs right under the starter, no wonder it died. I installed the new starter and a heat shied blanket around it to protect it from the exhaust heat. So far all is good.
One of the things I have always liked about the Z cars I have seen over the years was the optional headlight covers. I picked up a pair from Altec Products. These mount with either 3M tape of you can screw the mounting tabs to your headlight buckets. The driver's side fit perfectly but the passenger side was way off. I called Altec and they are sending me another passenger side cover. I hope the issue is with the cover and not the car. Altec sent the new cover in two days, gotta love customer service, and it fits perfect. I told Gregg I could pick out the bad part in a box of a thousand!
I continued work on the dash/console. I finalized the AC/heater control panel and mounted the controls. I modified the VATS removeable connector to be more usable and mounted it along with a second +12v output plug and a LED light with its activation switch inside the console storage compartment.
After DNI where I turned a best 12.921 I wondered how much HP this bone stock 94 LT1/4L60E with 115,000 miles really produces. The only modes I have made are the block hugger headers and a cold air system. Curiosity got the better of me so I set up an appointment with Balanced Performance for a baseline on their chassis dyno. It was a fun morning and the Z is one noisy beast at 128 mph! It did better than I expected, best of the 3 pulls was 265.6 RWHP @ 5200 and 308.0 Torque @3400. The curves were very smooth, no major blurps. HP started to drop off but only dropped to 250 at 6000 rpm. There was some HP fluctuation at high RPMs that could probably be fixed with some timing retarding above 4900 RPM. Looks like I need to learn how to tweek this PCM. And a better cam and heads couldn't hurt, LOL.
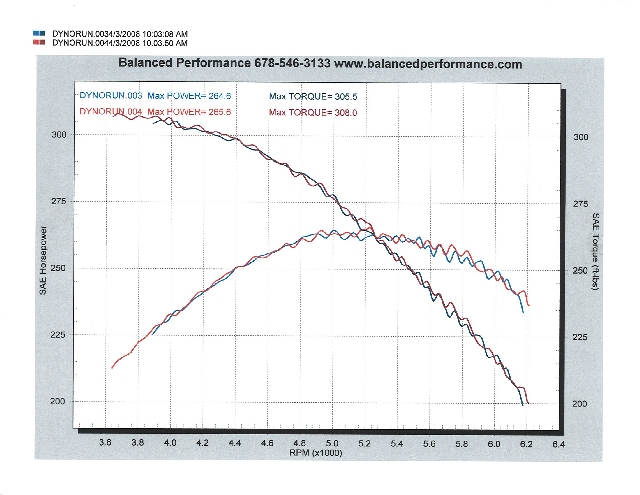
I have got to stay off EBAY! The silver painted front spoiler helped the look of the front quite a lot but I was still not satisfied. The huge black grille seemed to swallow the black bumper making the whole front end look like one big black hole. I found an aftermarket aluminum billet grille for a '04 Dodge Ram that I figured would fit with some trimming since its pretty much the same type grille I have installed. It took a little more fine trimming because this grille won't bend for installation like the plastic one did, but I got it to fit very nicely. It does improve the look of the front with the polished aluminum bars split across the middle by the black bumper. The car seems to look wider and lower and overall more professional than with the old black plastic grille. I fabricated a new bracket to mount my GranAm running lights just below the bumper.
While I was very happy with my 1/4 mile runs at DNI my 60 foot times were not that great. A lot of that I'm sure, other than my ineptness as a drag racer, was because of excessive wheel spin. 280Zs did not come with a limited slip differential which should improve the launch as well as make the car more predictable in handling. The other issue is the weakness of the stock 280Z u-joint axels. The V8 is putting out a lot more torque than these axels were designed to withstand. After an exhaustive search for options I have decided to go with stock Datsun parts for this. I picked up a 300ZX turbo R200 with a clutch type LSD. This has a 3.70 rear gear ratio while my existing R200 has a 3.54. The 3.70 gear will only change my engine by 100 RPM at 70 mph, not a drastic change and it should help in acceleration. I sent some 280Z companion flanges to Modern Motorsports to have them adapted for the stronger 280ZX CV axels I already have. I picked up some new axel seals for the R200, cleaned it up and painted the main body. The LSDs come with a finned rear cover. However to use this cover in a 280Z requires an adapter to clear the cross brace in the back. Many have chosen to use the stock open R200 cover instead. You lose some fluid capacity and cooling, but for a mainly driven street car this is fine. The cover that came with my LSD had several broken fins but I was able to swap it for a stock cover from one of the guys on HybridZ. I might have been able to sell it but with the broken fins that might have been difficult. One thing I was unaware of is the difference between the 280Z and the 300ZX driveshaft input flange bolt patterns. We had to swap out the input shafts. I suppose we could have drilled new holes in the 300ZX shaft to match the JTR adapter flange but swapping seems easier. Everything in the rear of the car seems tighter now that the swap is done. I had a clunk shifting from 1st to 2nd and 2nd to 3rd with the old setup, that is gone now. I'm not sure what caused that, could have been the mounts or even the diff itself. I also notice the inside tire squeals a little when I take off while turning, I suppose that is a "feature" of a LSD. I'm sure its my imagination but it seems like the car pulls stronger at even a modest launch. Going form a 3.54 to a 3.70 wouldn't make that much difference, I don't think.
After a little over 2000 miles I've had the first failure on the LT1 swap. Well there was that starter issue but since the car was never inoperable, it would eventually start, I don't consider that a real failure. On the way to work the car suddenly started making a weird sound from the engine bay. The check gauges light came on and the volt gauge was reading 10v, damn I've lost the serpentine belt. I was able to get the belt off the car, it had not broken but was wedged between the AC pulley and the compressor body. I was 6 miles from home but I made it home on the battery with no problem. That evening I started looking for problems that could have caused the belt to come off. I found the new AC compressor pulley would barely turn. So I headed to O'reilly's for a new one under the warranty. Since I don't have the AC plumbing done yet, yeah, yeah I know, I installed the old worn out noisy compressor until I can get the plumbing done and put oil in the compressor. I don't know if the lack of oil caused the compressor to die since I'm not engaging the clutch, but I'm not taking that chance again. It all seems to be working now but I find myself checking the volt gauge constantly now. Oh yeah, during all this swapping the belt in and out I managed to mess up the tensioner so I picked up a new one too. With the new tensioner the 97" belt I have will not fit, no clue why not. I optioned to a Gates belt which is 97 5/8" which still only barely fits. This is all confusing. Hopefully the tensioner or the compressor or both was the problem, time will tell.
Meanwhile one of the guys on HybridZ stumbled upon a power steering delete pulley (BK-MB31K) from PSC Performance Steering Components so I picked one up to replace the heavy PS pump I gutted. I had to re-tap the bottom hole in the Camaro accessory bracket to match the 3/8 bolt PSC provided. Space for the tap and handle is limited with all the accessories and hoses on the car, but only the bottom heater hose was really in the way. I decided not to put a belt on to use my AC compressor until its fully plumbed so I needed a belt for the passenger side accessories only. So without any belt I drove it to O'reilly's to pick a new belt for the passenger side accessories, its only a mile. First attempt was the stock Z28 belt but it is too long with the AC and PS delete pulleys. My next pick worked. I ended up with a GATES K060615 V-Ribbed Belt (Standard) 6 Ribs 13/16" x 62 1/8". This is only running the belt on the passenger side like the Camaro does but with the AC and PS delete pulleys. After I get the AC plumbed using the Bower AC setup on the driver's side I will use a GATES K060970 V-Ribbed Belt (Standard) 6 Ribs 13/16" x 97 5/8. This seems to fit better that the Goodyear version of the same number that came with the Bower setup because the Gates belt is a little longer and easier to get on.
To enhance the interior a little and to get bit more color coordinated I picked up a new steering wheel to replace my stock 280Z wheel. I chose a Grant F/X 2; Steering Wheel. It is a 14" wheel, high gloss silver metallic rim with black hand stitched grip areas and silver spokes. Using the grant wheel and its adapter will allow my to use my dream paddle shifters assuming can ever justify the money outlay. I have no clue why but this wheel makes the steering seem a lot tighter.
One of the first things I did after getting the car was replace the seats. The stock 280Z seats were pretty much shot and repairing them was more than I thought the seats were worth. 280Z seats aren't the most comfortable in the world even when new. What I ended up with was a set of early model Miata seats. These are pretty comfortable and fit pretty well but the upholstery isn't in the best condition with a few burns and ware marks. I have always like newer Corvette seat and have had my heart set on these for quite some time. I was able to score some Corevtte frames with foam off EBay for a very good price and found a local shop close to Atlanta that will make custom leather covers for them. I chose leather black inserts with silver bolsters. I think it looks really nice with the car's paint.
I received the seats frames and trail fitted them. They are tight but they will work. However there are no back adjustment levers but EBAY came through again for $27. I made adapters to mount them on my Datsun tracks. These seats sit much lower than the Miata seats so I made the adapters from 1x 4 rectangular tubing and welded them to the tracks. When I talked to Dennis, the upholstery guy, he told me the tracks had to be mounted before the covers went on. When I took the seats to have the covers made Dennis discovered a few things I was unaware of. First these are not C5 seats as I thought but C6 seats. You can tell because of the airbag fitting on the onside of the back. Second thing was the center foam is missing. Hm-m-m-m, I'm not sure what to make of that. The EBay ad showed it was missing but I was thinking that would just be part of the cover, wrong. Dennis said it wasn't a big deal he can make the foam and supports. He added foam on the back outside bolsters to replace the airbags, I had already removed the bracket. The seats came out awesome. The centers are black leather and the bolsters are silver leather to match the exterior and the steering wheel. They have a lot more bolster support than the Miata seats did.
Even though I have an automatic at times I like to shift through the gears myself. Especially during racing and my long term plans include a paddle shifter. Tachometers are great but during hard acceleration anticipating your shift point can be difficult. Tachs can lag real RPM especially during lower gears and staring at a tach can be a little distracting and take your attention off the road. A shift light is one way to answer these issues. I picked up a RPM Window Switch from Harlan Engineering which allows me to control any device I want through a relay at a preset RPM. The switch can be set for distributor, distributor-less, 2/4/6/8 cylinders and is adjustable in 100 RPM steps from 500 RPM to 12000 RPM without additional pills or modules. I set mine for 8 cylinders and 5700 RPM. I already had an extra red LED taillight bulb which I mounted in a small housing I also already had. I used velcro to attach the LED module low on the driver side windshield post. This will be bright enough for my peripheral vision to picked up without staring at it.
Ever since I have had this car the front end has had that infamous Datsun shimmy. I have changed the brakes, hubs, bearings, springs and struts. I have had the front-end aligned twice and even had the wheels and tires pressure balanced but it still shimmies between 60 and 80. Sometimes it�s worse than others. Recently I had an off-road incident; alright I did something stupid and ran over the curb. It damaged one of the wheel rims and since then it�s started to pull a little to the right. So I took it to the local tire store for a front end alignment. They balanced the wheel but said the front end tie rods needed replaced. After extensive research I decided discovered the RH side outer tie rod is no longer made. You can use the LH on both sides and the inner tie rods are very expensive. Someone on HybridZ told me I could buy the whole rebuilt rack with inner tie rods for less money. Sure enough I found one for $185 delivered. I also picked up some new poly mounts for the rack. All went well during the installation and the front end alignment. I took the car out for a shake down cruise and noticed right away there was excessive steering wheel play. But the good news was the front end shimmy I have dealt with for 2 years is gone. I thought I could simply adjust the steering rack as per the shop manual but it turned out the whole rack is shifting side to side when the wheel is turned. As it turns out this is a fairly common problem with our cars. To "fix" that rack movement problem I made some spacers from 20 gauge steel and Chris welded them to the bushing flanges on the rack, I only needed to add one spacer on the steering box side. The bushings fit very tightly now and the rack movement is gone. I really don't understand why Datsun made these fit so loosely. Anyway I'm back on the road, vibration free and the steering in tight and true.
I spent a small fortune getting a front disc brake upgrade and rear discs. Then after the LT1 conversion pretty much messed them up. First by not having the brake pedal adjusted right causing the brakes to lock. This warped the front rotors which had already been turned so they were trash. I also smoked the rear brakes by driving several times with the e-brake engaged, yeah pretty stupid I know. I have a warning light but for me its not really noticeable, I may have to add a audible warning. I decided to upgrade the front brakes with Silvermine Motors stage 4 kit and get new rotors for the rear. Since Silevemine's rotors are slotted, drilled and vented I wanted the same look for the rears. I really didn't know what brake system I had since I bought this used from a private owner who either didn't know or just misled me. I know the front calipers were Toyota 4-runner but didn't know what the rotors were. I was under the impression that both the front and rear were 280ZX...wrong. After a lot of research I have determined what I had was a Modern Motorsports front and rear setup. They both use 300ZX rotors.
I have been watching for a deal on side skirts for a while now and finally scored some on HybridZ. After they arrived I did a trial fit. Much like every other fiberglass part I have bought they don't really fit all that well. These are MSA 3 skirts and have a rather high fender area on the fenders which I don't like so I cut them right at the raised part of the lower fender. I wanted to screw these things on without damaging any noticeable body parts. The obvious place for screws is the door sill and I will do that. I also decided to screw them on the rolled wheel well lip of the fenders. The first thing I noticed is that the driver's side skirt are too long by 1/2" to fit tight against the wheel well. So I decided to section it! Really not that hard but it did involve a lot of glassing and sanding. I also added a couple braces under the skirts, bolted and glassed in, and screwed them to the body under the car. I do have a tendency to over do things, LOL. Lots of fiberglass, lots of sanding but I am finally done with the first one. Well the driver's side was tough but nothing compared to the passenger side. After attempting to screw the top to the door sills I realized I had problems, I could hear the fiberglass cracking. I looked under the car and saw the bottom of the skirt was flat at the front but about half way back it was twisted and that caused the rear to bow way out from the car, that can't be good. Since it was also too long I cut the back off about a foot from the rear. I then loosened all the screws on the sill and started heating the top of the skirt at the door sill bend. After it got soft I was able to screw it down tight. But the damage was done. There were a lot of cracks on the bend. I glassed the two sections together and trial fit it again, this time it all seemed to line up. I ground off the gel coat where the cracks were and added resin the rebuild the curve. I also noticed there were stress cracks on the bottom rear corner and at the corner at the door front and fixed those. I sanded my butt off but I think I have them as good as they are going to get. I hit them with a couple coats of sandable primer and sanded with 220 and finally 600 grit to smooth them out. I then painted them silver with 3 coats followed by 3 coats of clear. There are a few scratches and pin holes I didn't see before the paint went on but over all I am happy. Now that they are painted I used some 3M tape at the top where they meet the fenders and added some poly-caulking around the edges to seal it all up. After the poly dried for a few days I touched the seam up with silver paint.
Now that I have the skirts mounted I wanted to address the rear valance. Nullbound had given me a fiberglass valance he wasn't going to use because it is very plain. Another of the HybridZ posters, the guy I got the skirts from, had a MSA III rear bumper. But I want to keep my bumper and the MSA is really a cover that goes over the stock bumper. I like the look of the bottom of the MSA unit plus it incorporates a grille. So I decided I can modify mine to add the features of the MSA one. This one fits a little better than the skirts but were still some areas that needed modification. My 240Z bumper mounts interfere and the exhaust opening is not only in the wrong place I need one on each side. Those modifications were easy, making it look like the MSA unit will be much harder. I started by glassing in a piece of flat sheet fiberglass between the exhaust openings to simulate a diffuser. This will continue over the exhaust cutouts and along the fenders where it will flare to match the flare on the skirts. Or at least that is the plan. I then made some flares to match the rear flare on the skirts and blended those onto the sides. Getting these smooth took a lot of glass, filler, many coats of gelcoat and hours of sanding. I do not want to glass this thing into the body which meant some screws. I also do not want screws to show on the body. I used the same screw method on the fender wells I used on the skirts but glassed in three screws across the back to hold the bumper to the valance. So after all this I noticed it still didn't fit on the driver's side very well. Cut, reposition, glass, fill sand.....three times!!! I don't understand what happened during all this. I was sure each time I had everything fitting the way I wanted. But at long last I am ready to start painting. But before I did that I decided to cut a grille opening. I used my old Dodge grille to fill the opening. While it looks good I am looking for a one piece grille instead of this two piece one. I'm sure after the primer goes on I will see more imperfections requiring more filling and sanding...aw the joys of fiberglass! Flaws? Oh yeah we got flaws. But a couple more filler coats and its as good as its going to get. I laid down 3 coats of silver and 3 coats of clear. The paint looks pretty nice if I do say so myself. I'm not sure I'm satisfied with the overall results. The flares on the sides may be a bit much. I will live with it for a while and maybe change it to a more rounded look. I also think I want to add some glass to make the side sit more uniform to the body.
After a little over six months one of my halfshaft CV boots decided to spring a leak. Ya know, when I put these axels in I didn't like the look of the boots. They were old, probably the originals and were a bit dry I no doubt should have changed them then. I ordered new boots from Black Dragon to replace them. But being me I also found a second set of turbo halfshafts to modify rather than take my car off the road for any extended time, just in case I had issues getting these rebuilt. I did some research on HybridZ and read the shop manual on how to accomplish this task. After very carefully cutting off the inner CV boot with my angle grinder with a cutting wheel I discovered the first issue. There is no c-clip on the axle end, the bearing tripod is just pressed on. I was able to get them off using a gear puller with no problems. I cleaned everything up, what a mess that grease is. I positioned the boots and clamps ready to install and called my buddy Chris, knowing he owns a press. Rebuilding the new halfshafts wasn't the easiest thing I have ever done. The tough part was the way Datsun built the inner boot to bearing race connection. Basically you have to bend the metal part of the boot over to hold the bearing race, a total PITA. I managed to do it, its not pretty but its done. I added some RTV to alleviate the possibility of a leak at that point. When the old halfshafts were installed I farmed the job out. The shop told me they could not use the hats and the tension springs because they would not fit. So they simply applied RTV at the bearing race to companion flange connection. I was not thrilled with this "fix" but they do race Datsuns and assured me all was good. Some research about this proved they really were either uninformed or just too lazy to do this right. All you really need to do is remove the control arms to the frame bolts and move the suspension outward and the halfshafts with the hats will slide right in.
Its upgrade time. When I installed my LT1 the plan all along was to build a new engine to replace the high mileage (119K) Z28 engine I have in there now. The present engine now with 130K miles on it, other than using or leaking oil, runs fine but for my purposes I want a new engine. My plan is to drive this car across country and I don't want to do that with the present engine. Check New Engine for progress on the swap.
Its been a few weeks and I now have 427 miles on the new engine. I changed the oil at 150 and will do it again at 500. I am averaging 18.4 MPG which surprises me since the cam is much more aggressive that the old engine's stock cam. But then it is a new engine. I still have not replaced the injectors but plan on doing that soon. Then I will start to see what this engine can do.
There is one issue I have not been able to figure out yet. After the car is warm and I shift from drive to neutral or park the rpms jump to around 1400 before returning the 950 after a few seconds. I think it might be the IAC motor and will swap the throttle body with the one I took off the old engine after I get it cleaned up.
I did replace the old 7/8" brake master cylinder with the 15/16" one that should have been installed when I replaced the brakes. I really don't notice any difference but then I haven't really stood on the brakes. This master should give me a bit more rear brake power.
I finally got enough miles on the new engine to see what it will do. I took it out and flogged it a few times, its fast. But on the last flog the tranny didn't seem to shift right, like it was slipping badly going from 1st to 2nd and 2nd to 3rd. The next day it got measurably worse, there is definitely something wrong. At first all seemed fine but after about 10 minutes it was not shifting right at all even driving normal. I barely go it home. Even starting off I really had to go easy, it was slipping badly. The tranny fluid looked full, I tried putting more fluid in (thinking maybe that Lokar dip stick was not accurate) but it didn't make any difference. Of course I have no clue why it suddenly decided to go bad since all was good with the old engine and the tranny doesn't have that many miles on it since the PO had it rebuilt (11,000 miles). The tranny seemed to be working perfect during all the driving (500 miles) I did before I put my foot into the new engine. Ah, the joys of hot rodding, you will always find the weakest link.
So the transmission has to come out. I really don't want to have to pull the engine again and I think I can get the tranny out by itself. Drop the exhaust, pull the driveshaft support the tranny, don't forget to remove the engine oil sender, pull the tranny cross member and start lowering the tranny to get to the electric cables and the cooler lines and bell housing bolts, seems simple enough. The problem is accessibility those bell housing bolts. But I am if nothing else persistent and I managed to get it out. Unfortunately I did not have my jack positioned perfectly and had nobody to help support the tranny as I lowered it and it slide off the jack. No big deal but I will need a better plan to put the new transmission back in.
I really don't want to simply rebuild this transmission. I want something a bit stronger and with higher performance. I searched several websites and found a couple promising vendors. These transmissions are not cheap. I decided to check with Power Train Products. They sell upgraded 4L60E transmission but they are basically stock. While talking to Eddie who was very helpful when I bought my engine he told me he had exactly what I needed. Turns out he just finished his LT4 conversion on his '95 Z28 Camaro in January and decide two weeks ago to switch to a 6 speed manual. The 4L60E he was running he had built in their shop only has about 2000 miles on it. It too has all the goodies plus a shift kit and a 2800 stall. The stall is a little higher than I would prefer but we'll see how it acts. He said it was very street able. The best part is he sold it to me for less than half of what a new one would cost including shipping. He is throwing in a better after market flexplate and ARP flex to TC bolts. Just like the engine the tranny arrived in two days.
I made a tranny adapter for my jack out of a 12"x10"x1/2" chunk of NCR aluminum and a 22mm socket. It worked like a charm. It was very stable but I used some nylon straps to tie in down just in case. Would have been nice if I could have pivoted it up and down. I had to keep jacking up the engine to get it to align with the tranny. I am quite proud of myself. I was able to get the new transmission in by myself. Granted it took me 3 tries, finally figuring out the TC wasn't fully seated. Not sure if this was easier than pulling the engine but given I would have had to drain the coolant, pull the hood and disconnect all that wiring I think it probably was. Now that I know how to do it the next time, Lord forbid, it will be easier.
While the car was down I changed out the throttle body hoping it would fix the weird idle situation. I also got a new PCM program from Jody to remove the transmission shift pressure bump since this transmission has a shift kit and I don't need that mod anymore. The throttle body fixed the weird idle but now for some reason its idling at only 650 rpm but it does not rise when going from drive to neutral, that's a good thing. I played with the setting on the TPS voltage but it doesn't seem to help. Its possible I need some new parts, TPS and/or IAC.
The transmission seems to be working fine. The 2800 stall is only an issue when trying to drive over a bump slowly but I'm sure I will get used to that. It shifts great and at half throttle it shifts very solid. I kicked it from a dead stop and it shifted from 1st to second at 6000 but for some reason the engine bounced off the rev limiter at 6379 rpm and did not shift until I let off, that can't be good. I will have to investigate that before I go racing for sure. The 650 rpm idle problem turned out to be an oversite by Jody. He sent a new program with the idle set at 950 rpm and that issue is solved.
After living with the rear valance I made for a few months I decided I really did not like the look. I think without the tall rear spoiler it might have been alright but overall the back end of the car just looks too thick. So out came the cutoff wheel. I removed all the glass above the tailpipes and cut off the flares on the sides leaving them just behind the wheel openings. I still have a little finish work to do to get it perfectly smooth but it looks much better this way, see the photo at the top of this page.