|
|
New LT1 Engine Build
My plan all along in the LT1 transplant was to get the car running with this used LT1 from the '94 Z28 and then build a new engine for more reliability. That time has arrived. While the old engine is still running well it does have close to 130,000 miles on it and is leaking oil rather badly. Fixable for sure but it involves pulling the engine anyway so now would be the perfect time to build the new engine. I will hopefully recoup part of the cost by selling this engine after I fix the leaks.
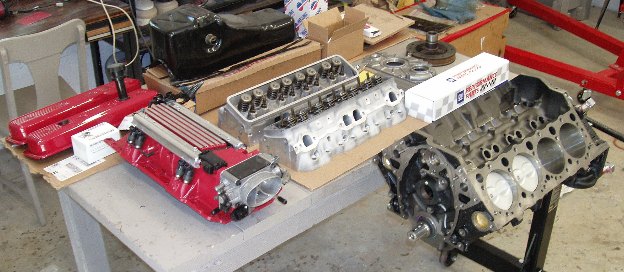
I have been searching EBay and Craigslist for a low mileage LT1 and I still have that '95 Z28 engine I bought for the original swap. The '95 engine turned out to need a total rebuild and I really haven't found a good low mileage engine. Then I found a source for a new GM crate 4 bolt main short block built on 04/08/98 at Power Train Products. The price wasn't too high when measured against all the new parts and machine work it would take to get my '95 block done. Plus I get the added feature of the 4 bolt mains.
I have also decided to upgrade the engine to gain a little HP. Nothing crazy, I still want a daily driver. For now the only upgrade will be the installation of a GM LT4 "hot cam". The specs for the cam: Duration at .050 in. 218/228, Lift .525/.525 with new springs and 1.6 ratio rockers from Summit.
The short block arrived very quickly taking only took 4 days including a weekend! The shipping depot is only 20 miles away so that saved me $100 for a home delivery or $50 for a business delivery. I took the '95 heads along with the new spring kit to the local hot rod builder to get them rebuilt.
I once again went with a 160 degree thermostat. Parts for this engine are expensive. Water pumps are over $100 and the timing chain and gear set is close to $100. I decided to install new seals in the front cover at $10 rather than buying a completely new one for another $75- $100.
Speaking of water pumps I looked hard at the Corvette or Caprice pump since they don't have that extra water pipe the F-body pumps do. But they also have a different orientation for the heater hoses and I don't want to change the setup I have now. So I got the F-body pump and fought that extra pipe until I got it out and put in the same expanding type plug I used before.
Next issue is the valve covers need to be modified for the new roller rockers. This means cutting out part of the webbing inside. I did that, hope I took enough out and in the right place. I could have gone with LT4 valve covers but they are rare and ridiculously expensive.
After some more research I have decided to not use the HV oil pump I bought and optioned for a new Melling standard pump. Seems that unless you do some oil return passage relief and run a bigger oil pan with a baffle you risk running out of oil at high RPMs. Granted I am not building a race engine so this risk is minimal but why take the chance. In addition running stock pushrods with the stronger valve springs from the LT4 cam kit is not a good idea. I picked up some Comp Cam hardened steel 7808-16 pushrods from my new best friends at Summit.
With what I think is all the parts gathered I am about ready to put this engine together.
I got the oil filter adapter mounted. The oil pump pickup was clocked, my buddy Chris welded it and I bolted it in place. I also got the water pump gear mounted.
I decided to test fit the oil pump drive gear. Ok its confession time. I over torqued the gear drive bolt and snapped it. Not sure how but I think my torque wrench has issues. Fortunately it did not bottom out so I was able to get the leftover bolt out with the punch...whew!! The top of this gear where it bolts to the block is plastic, come on GM, and I read this is prone to cracking. Upon inspection sure enough there is a small crack right at the bolt hole....I have little doubt that I caused that. A quick search on line to get the part number and a run to Rick Hendrick Chevy where everyone was impressed to see an LT1 in a Datsun I now have a new gear drive. That's another $84, hot rodding is not a cheap hobby.
Chris came over tonight for the engine build, good to have an expert that will work for food, LOL. But we did not get as much progress as we had hoped. Seems the parts guy (weekend help) at O'Reilly's sold me the wrong timing set, the one he sold me was for a regular SBC not a LT1, totally different. You'd think I would have noticed that. And of course they don't have the right one in stock, neither did two other places I went. I will have it tomorrow. We did get the oil pump, cam, lifters, lifter keepers and spider and the heads installed. Chris forgot his angle wrench for the final torque on the torque-to-yield head bolts so we couldn't fully torque the heads. Which meant we couldn't install the rockers because they would be in the way for the final torque setting.
Chris came back for the 2nd day of the rebuild armed with the angle wrench to finish the head bolt torque. We also installed the timing set, got the right one this time, the rockers and the timing cover. We installed the oil pan, the infamous optispark and the water pump. Man I hope this optispark is a good one, its the one that was on my '95 engine so I've never seen it run. I did get a new cap and rotor for it. We then attempted to install the harmonic hub and the balancer. Once again the LT1 bit us in the butt. The hub needs to be pressed on to the crack but it is rather thick where the bolt hole is. The GM 7/16-20 adapter on a standard harmonic installer is not long enough to reach the threads in the crank. We hit all three auto parts stores hoping against hope they would have what we needed, no luck. In fact I could not even find one on-line. Looks like I will have to make one. The next failure was priming the oil pump. Chris had brought his gutted Chevy distributor which would have worked if I actually owned a 1/2" drill! I managed to borrow one from my neighbor and got the pump primed. I picked up some 7/16-20 threaded rod, a few grade 8 nuts and washers and managed to make a hub installer.
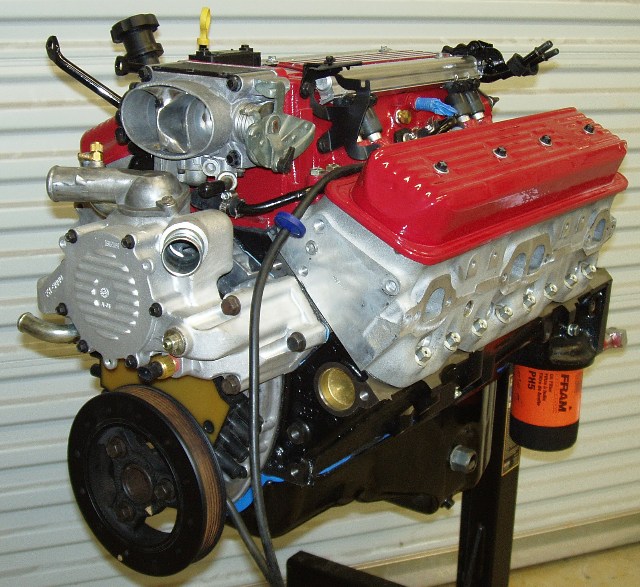
Chris came over for what has become the usual Friday night engine assembly. This was to be the final day for this build. All we had left to do was install the balancer hub, the balancer, and install the intake manifold. I wanted Chris to check my oil priming so we did that again, This time for a lot longer than I had previously done and then install the LT1 oil pump gear. My home made hub installer worked great pulling the hub on with no effort at all. We installed the intake, put new "O" rings that came with the intake gaskets on the injectors and installed the steam pipe using new bolts and washers.
My first attempt at an engine build went pretty well. Of course buying the GM short block made it easier and Chris was a major help since he really did most of the actual wrenching but I learned a lot. Maybe after I get this swap done I will attempt to rebuild the present engine myself.......................maybe. Now I guess I need to pull the car off the road and install it.
I spent some time trying to make sure I could program the PCM before I did the swap. I finally downloaded a trial version of WinFlash from TunerCat and that worked. This will allow me to change a few settings to accommodate the LT4 cam.
Then I started tearing out the old engine. The wiring harness will stay so it was simply unhooked and set aside out of the way. Since most of the bolt on stuff will be retained I pulled that off first. Both accessory brackets will remain along with the MAF, cold air induction system, coil, ignition module, plug wires and looms, alternator and AC compressor. I pulled the Taurus fan, the radiator and its hoses as a unit to give me more room for the engine pull. The headers came off next and then the whole exhaust needed to be dropped to allow access for the drive shaft removal.
Removing the driveshaft isn't that tough to do without the rear sway bar in there. I got that and the exhaust off, drained the tranny and got all the wiring and hardware connections off the tranny. I left the tranny cooler lines connected and will remove the line clamp from the engine after its all out. I unbolted the 6 motor mount bolts, 8 tranny cross member bolts and 1 tranny mount nut and pulled the puppy outta there. I separated the engine and tranny so I can swap the tranny to the new engine. The tail seal has been leaking for a while so I put a new one in.
After 10000 miles with the leaking LT1 and a few brake fluid issue the engine bay was to say the least dirty. I cleaned it up, slapped some new paint on the abused areas and cleaned up some wiring. I also cleaned up the transmission and reinstalled the Lokar dipstick which looked like the RTV had failed and could have been leaking.
One mistake I made during the engine pull was disconnecting the tranny from the engine before unbolting the torque converter from the flywheel. What a mess! As soon as the tranny came off fluid poured out of the torque converter. Oh well, live and learn. I was looking in my GM manual at the torque specs for the torque converter to flywheel bolts and they said NOT to reuse the bolts. I guess its back to Hendricks for some more parts.
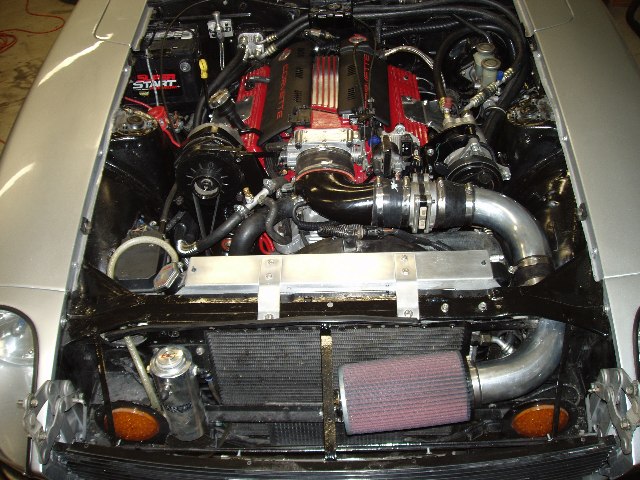
August 7, 2009. Today is engine install day. We got more done than I planned. When I removed the old engine I left the JTR mounts and GM motor mounts on the car, thinking that would be the easiest way to line everything up. That all worked out great. Six engine mount bolts, eight tranny cross member bolts and the tranny mount nut and its in solid. The engine and tranny went in pretty smoothly, only one stubborn motor mount bolt. Of course we had to take the tranny mount out again and lower the tranny a little when I discovered we were pinching the dipstick hose, not a big deal. We also got the driveshaft and headers on and some of the wiring hooked up.
Saturday and Sunday. Obviously we were not thinking well last night. We forgot to attach the electronic cables to the transmission. So I had to lower it again one more time. While I was under there I also hooked up the shifter linkage. I got the accessory brackets, alternator, AC compressor and all the delete pulleys mounted, installed the belt, the plugs and wires and got almost all of the wiring connected. I still have to get the radiator in and plumbed. Of course I am changing a few things from the way I had it on the old engine. I picked up some heat insulation tubing to run over the tranny cooler lines instead of the tape I had on them before. Another one is a better way of routing the plug wires though the accessory brackets.
The biggest problem I have found during this is the order of installation. Much of what I am installing now was done on the old engine a little at a time. I have found I have to remove something I just installed to install something else. I guess I need to slow down and think more, LOL. For instance, I just plumbed in all my AC and heater lines to the firewall fittings. I then realized I have not attached the battery ground wire to the back of the block. Of course all that plumbing is in the way, grrrrrr. Fortunately there is no coolant or AC R134 in there yet!
Monday. I finished connecting the rest of the wiring, at least I've run out of things to plug in. The radiator went in, plumbed and filled. Since the tranny cooler line run through the radiator before going to the cooler I could now filled the tranny too. All that is left is the starter and exhaust.
Tuesday. I installed the starter, easy job. I once again wrapped it with a thermo blanket to protect it from the header heat. Then I started installing the exhaust. I had pulled it completely out of the car to work on some other things like the new rear halfshafts. It took me 6 hours to get it back in. Note to myself, a one piece exhaust is NOT a one man job! That finishes the install, all that's left now is to see if it will start. I will charge the battery tonight, check everything one more time in the morning and see if the Z has a new heart.
Wednesday. So I go out this morning thinking it would fire right up. Well actually with my luck I thought it wouldn't fire. I was right. It didn't even try, it would turn over but didn't even attempt to fire. I either have no spark or no fuel. I was thinking optispark since that and the fuel injectors are really the only untested parts. I ran the opti test and it said all was good. Pulled a plug and it was dry as a bone. I sprayed a little starter fluid in the throttle body and it fire right up. OK its got to be the old injectors. I swapped out the complete fuel rail and injectors from the old engine and it fired right up. I ran it for 15 minutes, no leaks no horrible noises. I will let it cool down, change the oil and filter and see if it will move. I have an error code which I will investigate after I get the infamous LT1 cooling under control. Once again its fill the radiator vent off the steam from the bleeders, let it cool and do it over again. At long last I have it at least sitting at a consistent 200 degrees. Some of this is probably the fact the engine is new and friction creates heat. But the old one sat at 180 so I will keep an eye one it. Its been a long frustrating day, I will attack the error code and load my new PCM program tomorrow.
Thursday. A new day and a new attitude. First thing is the check the radiator again. I added more fluid and fired it up again. Very little air this time, its getting better, still sitting at 200. Next in line was to reprogram the PCM, thinking maybe it would take care of the error code too. Using Tunercats WinFlash software I programmed the PCM. Its always a little scary to hear the fan kick on and off and hear injectors fire while its programming but all went well. But the error code is still there. A quick internet search reveled Error code 42 has to do with the EST system which consists of the ignition module, computer (ECM/PCM), and the connecting wiring. There are four circuits to this system. Wait a minute, one of the things I swapped out during my first no start time was the coil and ignition module for one I bought on-line for a good price. Guess what??? Of course the ignition module is bad, I gotta stop being so cheap and just bite the bullet and buy stuff from the parts store. With that issue solved I decided a trip around the neighborhood was in order. The ride went without any major incident but there is something going on with the brakes. I think it might be the vacuum boost is being affected by the radical cam, this could be a problem. It was tough fighting the temptation to put my foot into this thing. It ran great and feels strong. Now I need to get a buddy over to help me get the hood back on. Since I have these trashed injectors I found a place Fuel Injector Connection that sells rebuilt balanced Blue Demon injectors. They also would rebuild mine. But the price difference is only $40 so I ordered the Blue Demons. I think for performance that will be the better move.
Friday. My buddy Gregg came over tonight to help me reinstall the hood. So with the hood on I am free to put some break-in miles on the car.