 |
||
|
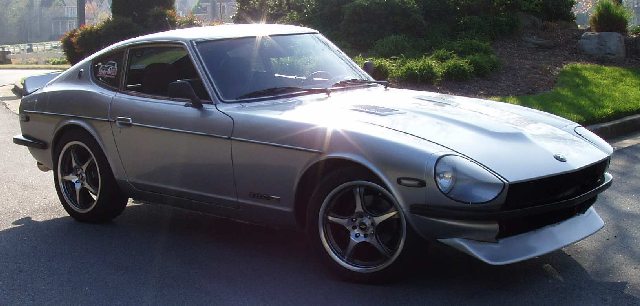
The Rebuild Begins When I received the car a friend of mine, Chris, took me to the transporter's depot to pick it up. Chris is the resident "car guy" where I work and his opinion and knowledge of cars and especially small block Chevy's is outstanding. First thing Chris noticed was one of the motor mounts seemed to be badly worn, as it turned out the bolt holding that motor mount on had lost the mounting nut!! "Yikes, I better check this thing out carefully before driving it too hard". While I had the engine raised up to fix the motor mount I decided to just replace mounts along with new grade 8 nuts and bolts. The one problem I already knew about was a leaking header. Leaking is not the word for describing it. After several attempts at fixing the badly broken header I decided to just get rid of them and optioned for cast iron manifolds instead. After all I wasn't planning on making a street racer out of this car and my experience with headers tells me they are more trouble on the street than they are worth. A few hours with a reciprocating saw and the headers and whole exhaust system were history. I hit a few of the local exhaust installation shops and decided on one that was very close. They weren't cheap but I now have a pretty cool system, loud but cool. They ran both pipes into "turbo mufflers" that sit beside the transmission, ran the exhaust pipes under the rear suspension and exited them both out the diver's side rear though square stainless exhaust tips. It all looks pretty nice and the noise makes it very clear what is living under the hood. My next undertaking was the engine. It ran strong but didn't idle too well. After a close look at the plug wires it was obvious that the headers had taken their toll on several of the wires. One was burned through to the bare wires and others had noticeable damage. While I was at it I decided to change out everything on the distributor too. Chris took one look at the distributor wiring, the main power line in particular which looked to be a 16 gauge wire and said that wire was no way large enough to support the current the HEI draws, he suggested a # 10 AWG. Now that I had gotten into the wiring under the hood I had stumbled into a nightmare. The guy who did this hybrid swap may have been a good mechanic but from an electrical standpoint he left a lot to be desired. Datsuns have a series of fusible links which apparently are a source of problems. He eliminated these with a mass of wiring junctions that would make a spider cringe! After cleaning all that up using a another fuse block to centralize all the +12v and rebuilding the distributor that car now purrs like kitten, well a large, noisy, powerful kitten. Now that I have it running pretty well I turned to the interior. This was one area where the previous owner wasn't quite as forthcoming as he could have been. He really never lied, but didn't volunteer that the interior was pretty much trashed. The carpet was faded and badly worn, both seats were in pretty bad shape with stuffing coming out of the driver's seat. The door panels had holes cut in them for speakers, I hate that, so I found replacement door panels and fabricated some oak/brass trim to cover the badly peeling chrome on the stock trim. One huge issue that has turned into a nitemare is that passenger door will not open from the outside. Try as I might I can't seem to figure out the problem, I may have to take this one to the experts. The dash did have a ABS cover on it which is what 99% of Datsuns this old have, that is fine. The headliner and all the plastic panels were in great shape. The center console had a couple breaks in it and would need replaced. All this did not upset me because I would have redone most of the interior anyway. First thing to do was gut this thing. One rather long Saturday I pulled out the door panels, the seats, the console, the carpet and much of the plastic panels and I was down to the floors. It was amazing the stuff I found during this. $1.48 in change, a few pieces of what appeared to be candy, a few pens, the California car registration, a nice find, a shop manual and 6 quarts of oil tucked under the rear hatch flooring. I then took the entire next day cleaning up 27 years of dirt and grime. Amazingly there was no rust even under the carpet. I added a lot of sound deadener before installing the new black carpet. With the carpet replaced I turned to a new console. You can buy replacement consoles for Z cars very easiely but I decided to build my own. With the V8/5 speed conversion the colsole just wasn't working with the shifter, besides I wanted wood. It wasn't the easiest thing I have ever taken on but eventually I had a new oak console to hold my new CD player. Twin 7x9 triaxle speakers were installed behind the seat so at long last I had tunes. Not a high-tech sound system of today with a whopping big sub-woofer, just an FM/CD with MP3 player to give me some rock while I cruise. Building a hybrid car involves a few little issues that sometimes are hard to resolve. Instrumentation is one of those things. This car had two of those issues, the tachometer and the water temperature gauge. The previous owner had solved both of these by using additional gauges, I did not want those hanging on my dash. The oil pressure, volt meter and gas gauge work fine since nothing really changed in those areas. I was able to locate and adaptor which would allow the Datsun water temperature sending unit to be used on the Chevy. That was easy, the tach on the other hand would be more difficult. Since the Datsun had a 6 cylinder engine and the Chevy is an 8 the stock tach is out of calibration. I drove it with the after market tach long enough to know where my red-line was reading the Datsun tach and removed the after market tach. At the same time I replaced the broken clock in the dash with a more reliable quartz clock. But suddenly after this the car would not start, wouldn't even turn over! This was strange since everything was fine the day before…..or was it? As it turn out the starter and decided it had lived long enough and took out the battery with it when it shorted. Weird that it would happen at this time. It took me quite some time to come to this conclusion and then only because I had tried to remove the wiring from the starter while debugging the starting problem the solenoid wires broke. This made it necessary to remove the starter the fix the stuck wire lug and while I had the starter out I took it to the local parts store to have it tested. "This puppy is toast" was what the shop tech told me. The next day I had a new starter and battery, all was well again. Since I had half the engine area wiring unwrapped I re-wrapped it and covered all the engine compartment wiring in black split tubing, sure makes it look much nicer. I was also able to eliminate a lot of left over wiring from the Datsun engine days that are no longer used. I really prefer the engine compartment in a hotrod to be painted black, just personal preference, so that's what I did next. One area I have read that is prone to rust in a Datsun or any car for that matter, is around the battery. This one had some surface rust on the firewall that needed to be fixed before it became a real problem. I have read about a paint designed just for this sort of thing called POR-15. It was designed for the shipping industry and according to their website "It chemically bonds to rusted steel to form a rock-hard, non-porous coating. POR-15 won't crack chip, or peel and works by isolating metal from moisture. Without moisture present, steel can't rust". However this stuff is not cheap at better that $20 a pint and if you get any on you it will have the wear off, trust me on that one! I also replaced the battery tray which had seen better days. Anytime you stuff a huge V8 in a car not designed for it you're going to have issues. One of those issues is cooling. This car has the standard hotrod electric fan for the radiator and it was mounted the standard way using those poorly designed plastic pull-tabs that tie the fan shroud to the radiator. Anyone who has seen these knows is a disaster waiting to happen. I had planned to fix that quickly with a real bracket but other things delayed that for as it turned out too long. After I finally took the fan off the radiator I noticed there had already been damaged done to the radiator. There was a tiny little leak and a lot of fin damage. I did some searching on-line for a new radiator and found they are not all that expensive at around $140 delivered, it would cost me most of that to get the old on "fixed". I fabricated and fan mounting bracket, a friend of mine with welding skills welded it all up and in less than an hour I was ready to install the hoses. "Hmmm something is not right here". It seems the previous owner had changed the bottom hose fitting on the radiator from the stock 1Ľ" to a 1˝" to match the Chevy water pump hose fitting. The top hose had a sleeve to adapt the Chevy 1˝" hose the to radiator but the bottom was did not have one. No problem, I'll just run up to the parts store and get one. They looked at me like I was insane! "We don't got no stickin' adaptors". They sent me to another parts store run by a local hotrod God. I explained my problem, he looked at the hose, told me to follow him to the "radiator hose room" where there must have been a thousand hoses hung on the walls. He looked around for a few minutes, took a hose off the wall and said "There ya go". I looked at him in awe, paid for the hose, took it home and installed it. I merely had to cut off about 2 inches at the radiator end to make it fit perfectly, amazing. This guys knows his stuff. Another issue with this setup up is the fan was hard wired to +12V. In other words it runs as soon as the ignition is turned on, not a good thing, it takes forever for the car to warm up and life expectancy of the fan is in question. In the real world the fan should only run when necessary and should be powered through a relay. I installed a thermal switch into the Chevy engine and added a fan relay. While I was at it I added a manual switch in parallel with the relay and a fan on indicator for backup. At long last I think I have most of what I want to accomplish under the hood done…..I hope. Now its back to the interior. That non-opening door has started to become a PITA. Not only won't it open there is no door panel on it since there seems little point to install it until the problem is solved. So as much as I hate to its off to the experts to pay out the big bucks. Well, it was expensive but at least I have a door that opens now. Back at the house I fitted both doors with the new mirrors I bought to replace the ugly wobbly ones that came with the car. I finally installed the other door panel so the interior is pretty much complete except for the seats. I found some Miata seats on EBay, charcoal gray which should look really nice with the silver paint and black carpet and door panels. This will be my next task, installing these. Its supposed to be reasonably painless, LOL. Of course just as I think all is well my heater blower decides it needs rebuilt and to be sure I know that it starts blowing fuses every time I attempt to turn it on. I pulled it out and disassembled it to discover 28 years worth of dirt and grime living inside the motor. I cleaned it all out, lubricated the brass bushings and put it all back together. To my surprise it works like new! Its good to have heat. There is still that problem of defrosting since the car at one time had air conditioning. Air will have to wait for some time however. One of the things about the 280Z vs. the 240z that I really don’t like is the bumpers. Our glorious government in an attempt to save us all from a horrible death mandated 5 mph front bumpers. On the Z cars this made for a very ugly bumper that does not flow with the sleek lines of this classic. So what to do but risk death and change the bumpers! Hey, this car is so low that bumper isn't going to prevent anything anyway. After and exhausting search for a 240Z front bumper for less than $400 I gave up and bought a fiberglass one. Installation was not the easiest thing I have ever attempted. Not being too talented with fiberglass work it took many hours to get mounting glassed into this thing. Fabricating the actual mounting hardware was not that tough. I had grown tired of sitting on an old floor mat instead of decent seat upholstery. Finding a Datsun seat in good shape is next to impossible and the price of getting them recovered seemed exorbitant. Back to the internet and search for seats produced the Miata seat option. Apparently this is a common swap for the Z cars. The seats are comfortable and they are easy to find in good condition. So it was off to EBay for a couple weeks of searching for a deal. While I was on EBay shopping for the Miata seats I picked up a new leather wrapped steering wheel and some really nice floor mats. Man, this thing is turning into an addiction, where will it all end!!! The seats finally arrived. Following some instructions I got form several members of Hybirdz message board I got the seats installed. The only problem I had was the mounting points for the seat fronts are not the same on both sides of the car, very weird. A slight modification to the brackets solved this issue. While these seats are not in perfect shape, they are way more comfortable than those stock Datsun seats. Its hard to believe the interior is finally complete. Of course there is always something to add, more speakers, some interior lighting that actually works and maybe some cooler switches. But for now I'm finished. Not being one to ever be satisfied with anything I began the research into 4 wheel disc brakes. As fate would have it I found someone close by selling a total suspension brake solution on HyBirdZ's website. A quick trip to Florida rewarded me with a front end Toyota 4 piston caliper setup and a rear 280ZX disc setup. It also has new poly bushings and new struts for the front. This is a ton of hardware and will be a challenge to get it installed. Certainly new territory for me. In that same vain I found a '95 Z28 LT1 350 engine to replace my present Holley powered V8. But once again fate steps in. My plan now is to swap out the suspension/brake setup and then install the LT1 components including the AC. This will take quite some time I'm sure so stay tuned, I will update on The Transplant Page as the projects unfolds. Although the tires and wheels that came on the car are nice they weren't really the type and size I wanted. Bigger tires and more performance was what I was looking for. I picked up some ADR 17" wheels and Falken Ziex ZE-512 215/50/17s to meet this need. Should I have done this at this time with the transplant getting ready to start?….NO. But I just couldn't fight the urge. And after all its only money right? |